Chameleon-AVR Nurve Networks, Chameleon-AVR Datasheet - Page 106
Chameleon-AVR
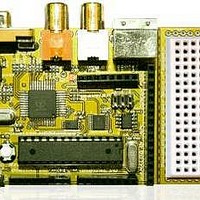
Manufacturer Part Number
Chameleon-AVR
Description
MCU, MPU & DSP Development Tools AVR8 & PROPELLER DEV SYSTEM (SBC)
Manufacturer
Nurve Networks
Datasheet
1.CHAMELEON-AVR.pdf
(268 pages)
Specifications of Chameleon-AVR
Processor To Be Evaluated
AVR 328P
Data Bus Width
8 bit
Interface Type
USB, VGA, PS/2, I2C, ISP, SPI
Operating Supply Voltage
3.3 V, 5 V
Lead Free Status / RoHS Status
Lead free / RoHS Compliant


As you can see, the Arduino setup is very similar to the AVRStudio setup, except that the Arduino tool along with the
bootloader allows us to program the AVR without the external programmer which is very convenient. The only downside is
you must use the Arduino tool, IDE, and setup. This isn’t too bad, but if you are a serious programmer, you will
immediately feel limited by the over simplified Arduino programming tool and its limitations. But, if you are a newbie then
you will probably really like the Arduino tool since it insulates you from the complexities of what’s really going on.
Referring to Figure 15.41, here’s what’s going on. First, there is a JAVA application that acts as the IDE for the Arduino
hardware (or compatible like the Chameleon). This JAVA application is nothing more than a GIU, it has very little
functionality, just enough for a crude text edit and a couple menus. But, the reason its in JAVA is that it will work on
Windows, Linux, and Mac OS X, that’s why they decided to use JAVA. Additionally, the application has the exact same
look and feel on each machine since it always uses the JAVA gui elements library which is nice.
Moving on, the Arduino editor creates projects in the form of “Sketches” these are nothing more than a primary C/C++ file
that you would refer to as you “main” file. The file imports all your libraries via headers and a special directory structure
that we will get to in a bit. In any event, you create a single sketch project then add #include statements to it which then
invokes the inclusion of all the libraries. Now, when you compile your program what happens is the GNU GCC C/C++
compiler is called in the background from a command line. The GCC compiler is also installed with the Arduino tool, but
you don’t have to do any setup at all. On Windows machines, the GCC compiler actually runs in a Cygwin linux shell (this
is a system that allows you to run Linux programs in Windows, you can learn about it below). Again, Cygwin is
transparently installed and you don’t have to worry about.
So, you edit your Sketch (program) in the Arduino editor, you compile it (with GCC under the hood) then finally you need
to download it to the Chameleon. The Arduino tool calls another program AVRDude which does this and sends the binary
image via the serial line with a special protocol agreed to between the bootloader and AVRDude. And that’s how it all
works!
Now before we get into the Arduino tool installation, a couple things to know. The Arduino tool actually uses C/C++ to
program in, its not some new language, its not BASIC, its straight up C/C++. There is a library for the Arduino called
“Processing” which allows you to use Processing language like commands and functions. Bottom line, the Arduino is
programmed in C/C++ nothing more. The Arduino guys have simply created libraries, so the system feels like the
Processing language, which you can read about here:
15.2.1 Installing the Arduino Toolchain in Windows
There isn’t really an installer for the Arduino tool, you more or less just copy the files (unzip, untar, etc.) the Arduino files
into a directory on your hard drive and that’s it. With Windows, Linux, and Mac OS there are some slight differences, but
more or less its all the same. We will concentrate on the Windows version here, the Linux and Mac installs are nearly
identical and you can read about them on the Arduino site itself. However, the adjustments we make the installation
directories are not on the Arduino site, thus read this section no matter what even if you are not installing on Windows.
The first step is to download the latest version of the Arduino development package for Windows. The latest files at the
printing of the manual are located on the DVD here:
http://www.cygwin.com/
http://processing.org/
DVD-ROM:\ CHAM_AVR \ TOOLS \ ARDUINO \ WINDOWS \ arduino-0017.zip
TIP
The Arduino bootloader is really nothing more than the standard bootloader provided by
Atmel for serial communications and loading of firmware without the AVR ISP MK II
programmer or similar. Thus, you can actually use other tools like “AVR Dude” to
download firmware written in AVRStudio. Moreover, there are other bootloaders for the
AVR chips that you can flash into them that support other 3
problem with all this is that you need a tool to program the bootloader in the first place!
Thus, if you frag a bootloader in FLASH memory and you don’t have an actual
programmer like the AVR ISP MK II you are out of luck. This is why we suggest
spending $30-40 and buying one just in case if you’re going to do serious AVR
development.
© 2009 NURVE NETWORKS LLC “Exploring the Chameleon AVR 8-Bit”
rd
party tool. However, the
106
Related parts for Chameleon-AVR
Image
Part Number
Description
Manufacturer
Datasheet
Request
R

Part Number:
Description:
MCU, MPU & DSP Development Tools PIC24 & PROPELLER DEV SYSTEM (SBC)
Manufacturer:
Nurve Networks
Datasheet:

Part Number:
Description:
MCU, MPU & DSP Development Tools AVR8 VIDEO GAME DEV SYSTEM (SBC)
Manufacturer:
Nurve Networks

Part Number:
Description:
MCU, MPU & DSP Development Tools PIC24 VIDEO GAME DEV SYSTEM (SBC)
Manufacturer:
Nurve Networks