33000 Parallax Inc, 33000 Datasheet - Page 7
33000
Manufacturer Part Number
33000
Description
Power Management Modules & Development Tools 30W Solar Cell Kit
Manufacturer
Parallax Inc
Datasheet
1.33000.pdf
(20 pages)
Specifications of 33000
New! Us2012 Catalog Page
Solar Cells_Panels
Voltage - Output
*
Operating Temperature
*
Current Short Circuit (isc)
*
Package / Case
-
Lead Free Status / RoHS Status
Lead free / RoHS Compliant
Available stocks
Company
Part Number
Manufacturer
Quantity
Price
Company:

Part Number:
33000-0001
Manufacturer:
MOLEX
Quantity:
43 635
Company:
Part Number:
33000-0001
Manufacturer:
MOLEX
Quantity:
35 000
Company:
Part Number:
33000-0002
Manufacturer:
MOLEX
Quantity:
25 000
Company:
Part Number:
33000-0002
Manufacturer:
STARCONN
Quantity:
12 450
Company:
Part Number:
33000-0003
Manufacturer:
MOLEX
Quantity:
43 637
Part Number:
330000001
Manufacturer:
MOLEX
Quantity:
20 000
Part Number:
330000002
Manufacturer:
MOLEX
Quantity:
20 000


Section B – Tabbing Wire Preparation: Patience Is Essential!
This panel is designed with (12) solar cells connected in series, yielding about 6.0 VDC (12 cells at 0.5
volts each). Figure 12 shows the connection scheme that we ultimately want to accomplish. To wire
solar cells in series, we need to connect the top of the first cell to the bottom of the second cell, and the
top of the second to the bottom of the third, and so on…until all (12) cells are connected in series.
Since the bottom of the cells are not accessible after they’ve been mounted on the Base Panel, we need
to solder the tabbing wire to these underside connections first.
appropriate location on the Base Panel, and make the top-of-cell solder connections last.
Step 6 — Preparing the Tabbing Wire and Opening the Solar Cell Pack
Copyright © Parallax Inc.
Measure and pre-cut (18) pieces of flat tabbing wire, 10” long each.
tabbing wire to get rid of any kinks, so the wire will solder perfectly flat against the cell: Firmly grasp
an end of the wire with one hand, pinch the wire with your other hand’s index finger and thumbnail,
and then slowly draw out any kinks or curves in the wire. Be wary of “crimped-cuts” on the wire
ends, which will not lie flat during the soldering process. Take the time to flatten out these little
imperfections, and subsequent assembly will go much smoother.
WATCH THE VIDEO demonstrating safe cell handling and soldering techniques before beginning.
Search “33000” at www.parallax.com, and then find the video link on the 33000 product page. If you
break a cell in any of the following steps, don’t panic. Go to page 19 and read through Section F –
...Oh, no… I broke a cell! You may be able to salvage it.
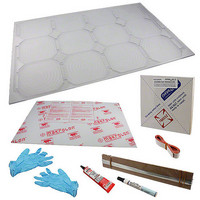
Make sure that you have a clean and flat surface
for this stage of assembly.
Place the cell package with the “cut along dotted
lines” side up, as shown in Figure 13. Use an
X-acto knife to cut an “X” diagonally across the
plastic wrapper, as shown on the package.
Carefully lift the top piece of plywood off of the cell
package. Carefully open the paper wrapper to
expose the cells, but leave them in their “stack.”
Do not spread the cells out across your work
area – they are far less likely to chip, crack, or
break when kept in their “stack.”
Tabbing wire soldered to first cell’s top bus-bar
1st cell
Tabbing wire soldered to adjacent cell’s bottom bus-bar
30 Watt Solar Panel Kit (#33000)
Figure 12
2nd cell
Top of cell
We’ll then place each cell into its
Figure 13
v1.0 2/19/2010 Page 7 of 20
Carefully straighten each
…nth cell
Related parts for 33000
Image
Part Number
Description
Manufacturer
Datasheet
Request
R


Part Number:
Description:
Microcontroller Modules & Accessories DISCONTINUED BY PARALLAX
Manufacturer:
Parallax Inc

Part Number:
Description:
BOOK UNDERSTANDING SIGNALS
Manufacturer:
Parallax Inc
Datasheet:


Part Number:
Description:
COMPETITION RING FOR SUMOBOT
Manufacturer:
Parallax Inc
Datasheet:


Part Number:
Description:
TEXT INFRARED REMOTE FOR BOE-BOT
Manufacturer:
Parallax Inc
Datasheet:
Part Number:
Description:
BOARD EXPERIMENT+LCD NX-1000
Manufacturer:
Parallax Inc
Datasheet:

Part Number:
Description:
CONTROLLER 16SERVO MOTOR CONTROL
Manufacturer:
Parallax Inc
Datasheet:

Part Number:
Description:
BASIC STAMP LOGIC ANALYZER
Manufacturer:
Parallax Inc
Datasheet:

Part Number:
Description:
IC MCU 2K FLASH 50MHZ SO-18
Manufacturer:
Parallax Inc
Datasheet: