IP20 SOLA HEVI DUTY, IP20 Datasheet - Page 33
IP20
Manufacturer Part Number
IP20
Description
Fuse Cover Kit
Manufacturer
SOLA HEVI DUTY
Datasheet
1.RELAY_CARD-INT.pdf
(46 pages)
Specifications of IP20
Peak Reflow Compatible (260 C)
No
Kit Contents
2 Covers And Thread Forming Screws
Leaded Process Compatible
No
For Use With
SBE Fuse Block
Lead Free Status / RoHS Status
Lead free / RoHS Compliant
Available stocks
Company
Part Number
Manufacturer
Quantity
Price

Part Number:
IP2000-06
Manufacturer:
IR
Quantity:
20 000
Company:
Part Number:
IP2001
Manufacturer:
International Rectifier
Quantity:
10 000
Part Number:
IP2001
Manufacturer:
IR
Quantity:
20 000
Company:
Part Number:
IP2001PBF
Manufacturer:
International Rectifier
Quantity:
10 000
Company:
Part Number:
IP2001TR
Manufacturer:
IR
Quantity:
1 000
Company:
Part Number:
IP2001TR
Manufacturer:
International Rectifier
Quantity:
10 000
Part Number:
IP2001TR
Manufacturer:
IR
Quantity:
20 000
Company:
Part Number:
IP2001TRPBF
Manufacturer:
International Rectifier
Quantity:
10 000
Company:
Part Number:
IP2002
Manufacturer:
International Rectifier
Quantity:
10 000
Part Number:
IP2003
Manufacturer:
IR
Quantity:
20 000
Part Number:
IP2003AP
Manufacturer:
IR
Quantity:
20 000


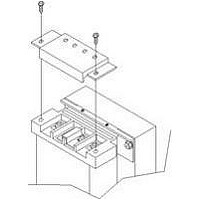
1. Remove the 5U bezel panel on the front of the UPS
2. Remove battery access door by loosening the
3. Use a Phillips (cross-head) screwdriver to remove
4. Disconnect the battery connectors in the front of
5. Lift the internal connector out of the way and slide
6. Unpack the new battery assembly, taking care not
7. Line up and slide in the new replacement battery
8. Reconnect the electrical connections for each
9. Install the battery retaining brackets using the
10. Install the battery access panel and tighten the
by removing the screws located on the sides of the
bezel (see illustration at right).
captive screws and tipping the panel forward. Lift
to remove it from the main cabinet.
the screw in the battery retaining bracket on each
battery pack (see illustration at right). Remove the
retaining brackets.
each battery pack.
the battery out of the UPS. Support the weight of
the battery to prevent it from falling.
to destroy the packing. Compare new and old
battery assemblies to make sure they are the
same. If so, proceed with Step 7; otherwise STOP
and contact your local dealer, Sola/Hevi-Duty
representative or the Sola/Hevi-Duty Technical
Support Services.
pack while holding the internal connector out of
the way.
battery pack.
Phillips removed earlier.
captive screws.
NOTE
These are hot-swappable replacement
batteries. However, caution should be
exercised because during this procedure the
load is unprotected from disturbances and
power outages.
27
Retaining screw
5U Bezel with Battery Access
Battery Access Bezel Screws
Door Behind Bezel
Battery Connectors
UPStation GXT
- +
AC INPUT
BATTERY UPS ON
BYPASS
Retaining bracket
UPStation GXT
- +
AC INPUT
BATTERY UPS ON
BYPASS
Maintenance
Related parts for IP20
Image
Part Number
Description
Manufacturer
Datasheet
Request
R

Part Number:
Description:
Encapsulated/PC Board Transformer
Manufacturer:
SOLA HEVI DUTY
Datasheet:

Part Number:
Description:
Linear & Switching Power Supplies 250W 24V @ 10A
Manufacturer:
SOLA HEVI DUTY
Datasheet:

Part Number:
Description:
Surge Suppressors DIN Rail Sgl Pair TVSS 36V
Manufacturer:
SOLA HEVI DUTY
Datasheet:

Part Number:
Description:
Surge Suppressors Cat 5/6 POE mal-fem
Manufacturer:
SOLA HEVI DUTY
Datasheet:
Part Number:
Description:
Surge Suppressors 2 Pair data/signa l Protection36V
Manufacturer:
SOLA HEVI DUTY
Datasheet:
Part Number:
Description:
Surge Suppressors Cat 5/6 POE fem-fem
Manufacturer:
SOLA HEVI DUTY
Datasheet:

Part Number:
Description:
Surge Suppressors Base Connector STC-642 Series
Manufacturer:
SOLA HEVI DUTY
Datasheet:
Part Number:
Description:
Surge Suppressors CCTV Coax surge protection
Manufacturer:
SOLA HEVI DUTY
Datasheet:
Part Number:
Description:
Surge Suppressors CCTV Coax surge protection Isolated
Manufacturer:
SOLA HEVI DUTY
Datasheet:
Part Number:
Description:
Surge Suppressors DIN Rail Sgl Pair TVSS 22V
Manufacturer:
SOLA HEVI DUTY
Datasheet:

Part Number:
Description:
Surge Suppressors DIN Rail Sgl Pair TVSS 60V
Manufacturer:
SOLA HEVI DUTY

Part Number:
Description:
Surge Suppressors RJ-11 Telephone Surge Protection
Manufacturer:
SOLA HEVI DUTY
Datasheet:
Part Number:
Description:
Surge Suppressors 2 Pair data/signal Protection20V
Manufacturer:
SOLA HEVI DUTY
Datasheet:
Part Number:
Description:
Surge Suppressors DIN RAIL Kit PCB1B base
Manufacturer:
SOLA HEVI DUTY
Datasheet: