AC244006 Microchip Technology, AC244006 Datasheet - Page 28
AC244006
Manufacturer Part Number
AC244006
Description
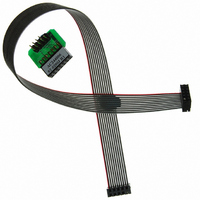
KIT MPLAB REAL ICE TRACE
Manufacturer
Microchip Technology
Datasheet
1.AC244006.pdf
(72 pages)
Specifications of AC244006
Accessory Type
Interface Board
Features
Instruction Trace Capability, Polarized Interface
For Use With
PIC32MX Plug-in Modules
Lead Free Status / RoHS Status
Lead free / RoHS Compliant
For Use With/related Products
PIC32
Lead Free Status / RoHS Status
Lead free / RoHS Compliant
Available stocks
Company
Part Number
Manufacturer
Quantity
Price
Company:

Part Number:
AC244006
Manufacturer:
Microchip Technology
Quantity:
135


4.3
4.4
4.5
4.6
DS51616A-page 24
CREATING A PROJECT
VIEWING THE PROJECT
BUILDING THE PROJECT
SETTING CONFIGURATION BITS
®
The easiest way to create a new project is to select Project>Project Wizard. With the
help of the Project Wizard, a new project and the language tools for building that project
can be created. The wizard will guide you through the process of adding source files,
libraries, linker scripts, etc. to the various “nodes” on the project window. See MPLAB
IDE documentation for more detail on using this wizard. The basic steps are provided
here:
• Select your device (e.g., PIC24FJ128GA010)
• Select a language toolsuite (e.g., Microchip C30 Toolsuite)
• Name the project
• Add files (e.g., program.c, support.s, p24FJ128GA010.gld)
After the Project Wizard has created a project, the project and its associated files are
visible in the Project window. Additional files can be added to the project using the
Project window. Right click on any line in the project window tree to pop up a menu with
additional options for adding and removing files.
See MPLAB IDE documentation for more detail on using the Project window.
After the project is created, the application needs to be built. This will create object
(hex) code for the application that can be programmed into the target by the MPLAB
REAL ICE in-circuit emulator.
To set build options, select Project>Build Options>Project.
When done, choose Project>Build All to build the project.
Although device Configuration bits may be set in code, they also may be set in the
MPLAB IDE Configuration window. Select Configure>Configuration Bits. By clicking on
the text in the “Settings” column, these can be changed.
On most devices, the Watchdog Timer is enabled initially. It is usually a good idea to
disable this bit.
Don’t forget to add a linker script file to your project. Linker scripts may be found,
by default, in the following directories:
MPLAB ASM30
- C:\Program Files\Microchip\MPLAB ASM30 Suite\Support\gld
MPLAB C30
- C:\Program Files\Microchip\MPLAB C30\support\gld
- C:\pic30_tools\support\gld
Note:
On the Project Manager toolbar, select “Debug” from the drop-down list.
™
© 2006 Microchip Technology Inc.
Related parts for AC244006
Image
Part Number
Description
Manufacturer
Datasheet
Request
R

Part Number:
Description:
Manufacturer:
Microchip Technology Inc.
Datasheet:
Part Number:
Description:
Manufacturer:
Microchip Technology Inc.
Datasheet:
Part Number:
Description:
Manufacturer:
Microchip Technology Inc.
Datasheet:
Part Number:
Description:
Manufacturer:
Microchip Technology Inc.
Datasheet:
Part Number:
Description:
Manufacturer:
Microchip Technology Inc.
Datasheet:
Part Number:
Description:
Manufacturer:
Microchip Technology Inc.
Datasheet:
Part Number:
Description:
Manufacturer:
Microchip Technology Inc.
Datasheet:
Part Number:
Description:
Manufacturer:
Microchip Technology Inc.
Datasheet: