9946 3M, 9946 Datasheet - Page 9
9946
Manufacturer Part Number
9946
Description
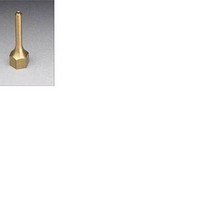
Soldering Tools .072 HOT MELT TIP SCOTCH WELD 3PC BAG
Manufacturer
3M
Type
Brass Extension Tipr
Datasheet
1.9946.pdf
(26 pages)
Specifications of 9946
Tip Size
0.072 mm
Product
Soldering Tips
Lead Free Status / Rohs Status
Lead free / RoHS Compliant
Other names
021200-22040
Available stocks
Company
Part Number
Manufacturer
Quantity
Price
Company:

Part Number:
994684-3
Manufacturer:
TE/AMP
Quantity:
30 000


Preventive Maintenance
Before Operation
1. Make sure filtered compressed air is available,
2. Make sure that the 3M Scotch-Weld Hot Melt
3. Inspect nozzle tip daily. Make sure tip is clean
7
regulated to a maximum of 80 psi or to a
minimum of 40 psi. DO NOT OPERATE 3M™
SCOTCH-WELD™ HOT MELT
APPLICATOR PG II LT BELOW 40 PSI. If
low flow is experienced at 40 psi see page 9,
Troubleshooting.
Applicator PG II LT is plugged into 120 VAC and
that the switch is in the “on” position.
and clear of foreign matter. Using a coarse cloth,
wipe off any accumulated adhesive or other
foreign matter on the tip.
4. Be sure there is adhesive in the loading chamber.
5. Under normal conditions, allow at least 15
6. Under normal operations the in-line air filter
7. Periodically inspect the applicator to ensure that
Contact with molten adhesive or hot applicator tip
or metal components may cause burns. Wear
heat-resistant gloves and safety glasses when
operating or repairing the 3M Scotch-Weld Hot
Melt Applicator PG II LT.
minutes for the applicator to warm up.
If proper shutdown procedure has not been
followed (see Preventive Maintenance, "After
Operation," page 8), up to one hour heat up prior
to use may be required.
should be removed and cleaned every six months
(some air systems may require more periodic
changing). Simply remove the filter from the air
supply line and blow compressed air through the
filter in reverse of normal air flow to remove
particular matter.
assembly is proper (i.e. watch for loose screws,
worn pins, etc). See page 9 through 19 for
Troubleshooting and Repair Procedures.
!
Caution
Note
© 3M 2006