DVK-WLM400 Laird Technologies, DVK-WLM400 Datasheet - Page 18
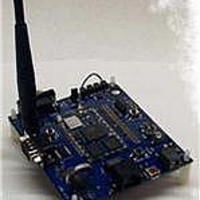
DVK-WLM400
Manufacturer Part Number
DVK-WLM400
Description
DEVELOPMENT KIT WISM+
Manufacturer
Laird Technologies
Type
Transceiverr
Datasheet
1.DVK-WLM400.pdf
(43 pages)
Specifications of DVK-WLM400
Frequency
2.4GHz
Processor Series
WISM+
Silicon Manufacturer
Laird Technologies
Kit Application Type
Communication & Networking
Application Sub Type
Wi-Fi Intelligent Serial
Kit Contents
PCB, 2x Antennas, Power Adapter, USB Cable, RS-232
Rohs Compliant
Yes
For Use With/related Products
WLM400
Lead Free Status / RoHS Status
Lead free / RoHS Compliant
Lead Free Status / RoHS Status
Lead free / RoHS Compliant, Lead free / RoHS Compliant


4 Software- WIF
WIF.exe has been installed by running the setup file from the download and is launched by clicking…
WIF.exe actually exists in the following folder… c:\Program Files\Laird Technologies\Wism+
The WIF.exe tool is used for the following:
By default, WIF.exe uses the USB interface to a Windows PC.
NOTE: WIF.exe can be made to communicate over any of the WISM+ host interfaces,
There are some specific things which need to be done depending upon which host interface of the WISM+ Dev Kit
which you are going to use. USB is the default, but Ethernet, RS-232, and SPI will also work.
The required preparation for using each of these interfaces will be described in the following sections.
4.1 Setting up PC ports for WIF-WISM+ communications
4.1.1 Configuring PC USB port for WIF.exe
To use the PC USB port to communicate with the WISM+ Dev Kit, a USB driver must be installed. This driver exists
on your PC after running SETUP.EXE. By default, WIF.exe will look for an active USB connection from the PC to the
WISM+.
Before starting the WIF.exe software, perform the following steps…
•
•
•
•
•
•
•
•
•
•
•
Now go to section:
© Laird Technology 2010
StartAll ProgramsWism+Wism+ Config Tool
basic WISM+ configuration (over USB, Serial, Ethernet, or SPI)
performance tool to measure WISM+ to Wireless Access Point/Router data through-put
Set the Dev Kit power switch to the OFF position
Plug the AC/DC wall brick power adapter into an AC power outlet, and the other end into the Dev Kit’s DC
power jack.
Attach the USB cable between the Dev Kit USB jack and your PC.
Switch the Dev Kit power switch to the “ON” position
Wait for the WISM+ to boot- the “Heartbeat LED” (labelled “RUN” on the WISM+ Dev Kit) will begin to flash at
a 1Hz rate and then you will hear the USB device register with the PC.
Your PC will notify you that new hardware has been found
When Window’s “New Hardware Wizard” pops up, instruct it to look for the appropriate driver on your PC
The wizard will find the USB driver and install it.
Once the driver installation is complete, you are ready to proceed.
You are now ready to start Wif.exe…
“Starting
WIF.exe”
Version 1.00
WISM+ DVK MANUAL
Page 13
.
Related parts for DVK-WLM400
Image
Part Number
Description
Manufacturer
Datasheet
Request
R

Part Number:
Description:
BLUETOOTH EVAL BOARD BTM511
Manufacturer:
Laird Technologies
Datasheet:

Part Number:
Description:
Bluetooth / 802.15.1 Modules & Development Tools BLUETTH AT Data MODLE, No ANT DEVKIT
Manufacturer:
Laird Technologies
Part Number:
Description:
Bluetooth / 802.15.1 Modules & Development Tools BLUETTH Multimed MODLE, No ANT DEVKIT
Manufacturer:
Laird Technologies
Datasheet:

Part Number:
Description:
BLUETOOTH MODULE DEVELOPMENT KIT
Manufacturer:
Laird Technologies
Part Number:
Description:
Bluetooth 2.0 AT Data Module, Internal Antenna Development Kit
Manufacturer:
Laird Technologies

Part Number:
Description:
BT MM DEV KIT
Manufacturer:
Laird Technologies
Datasheet:
Part Number:
Description:
Bluetooth / 802.15.1 Modules & Development Tools BLUETTH HCI Data MDLE INTRNLANT DVKIT
Manufacturer:
Laird Technologies
Datasheet:
Part Number:
Description:
Bluetooth / 802.15.1 Modules & Development Tools BLUETTHMultimedMODLE Plus No Ant DEVKIT
Manufacturer:
Laird Technologies
Part Number:
Description:
Bluetooth / 802.15.1 Modules & Development Tools BLUETTH HCI Data MDLE No ANT DVKIT
Manufacturer:
Laird Technologies
Datasheet:

Part Number:
Description:
KIT FOR PRM113
Manufacturer:
Laird Technologies
Datasheet:

Part Number:
Description:
DEV KIT PRM122
Manufacturer:
Laird Technologies
Datasheet:
Part Number:
Description:
DEV KIT PRM123
Manufacturer:
Laird Technologies
Datasheet:

Part Number:
Description:
KIT FOR PRM112
Manufacturer:
Laird Technologies
Datasheet:
Part Number:
Description:
DEV KIT PRM121
Manufacturer:
Laird Technologies
Datasheet:

Part Number:
Description:
Bluetooth / 802.15.1 Modules Class2 v2.1+EDR Kit AT Data, Int Ant,SSP
Manufacturer:
Laird Technologies Wireless M2M
Datasheet: