DEMO9S08JS16 Freescale Semiconductor, DEMO9S08JS16 Datasheet - Page 3
DEMO9S08JS16
Manufacturer Part Number
DEMO9S08JS16
Description
BOARD DEMO FOR JS16 FAMILY
Manufacturer
Freescale Semiconductor
Type
MCUr
Datasheets
1.DC9S08JS16.pdf
(49 pages)
2.DEMO9S08JS16.pdf
(32 pages)
3.DEMO9S08JS16.pdf
(8 pages)
4.DEMO9S08JS16.pdf
(8 pages)
5.DEMO9S08JS16.pdf
(4 pages)
Specifications of DEMO9S08JS16
Contents
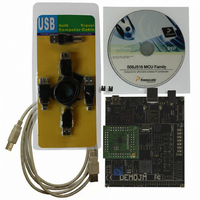
2 Boards, Cable, Documentation, DVD
Processor To Be Evaluated
MC9S08JS16
Data Bus Width
8 bit
Interface Type
USB
Operating Supply Voltage
5 V
Silicon Manufacturer
Freescale
Core Architecture
HCS08
Core Sub-architecture
HCS08
Silicon Core Number
MC9S08
Silicon Family Name
S08JS
Rohs Compliant
Yes
For Use With/related Products
MC9S08JS16
Lead Free Status / RoHS Status
Lead free / RoHS Compliant


Step-by-Step Installation Instructions
HID Class Keyboard
Start this lab with the board powered “On” and both provided USB cables connected between
host and board.
1.
2.
3.
4.
5.
6.
7.
8.
9.
10. Click button labeled “PTG1” for Page Up key action.
11. Click button labeled “PTG2” for Page Down key action.
12. Click button labeled “PTG3” for Caps Lock key action; the
13. Click the Num Lock and/or Caps Lock key on your
LAB
1
Open CodeWarrior™ for Microcontrollers. From the
Windows start menu, you can locate it using the path
“Programs>Freescale CodeWarrior>CW for Microcontroller
V6.2>CodeWarrior IDE.exe.”
From the CodeWarrior startup dialog, click “Start Using
CodeWarrior.”
Open the HID keyboard example project by pressing
“Ctrl” + “O” keys simultaneously. Follow C:\Program
Files\MC9S08JS16Demo\JS16_HID_Keyboard and select
“JS16_HID_Keyboard.mcp,” then click “Open.”
Remove all jumpers on J4 (demo board).
With the board turned on and both cables attached between
host and board, compile and program the JS16 MCU with
the HID class keyboard by clicking the button to launch the
debugger.
From the connection manager menu, select “DEMOJM on
USB1” port and click “Connect (Reset).”
From the Erase and Program Flash menu, click “Yes” to
allow the debugger to mass erase the MCU’s on-chip flash
memory and program it with the new application.
Click the “Start/Continue (F5)” button in the debugger to
run the application. Close the debugger.
Your computer will automatically recognize the JS16 as
a HID keyboard and begin the installation without user
interaction. When the installation is complete, the JS16 will
behave as a keyboard.
LED labeled “PTE3” will be switched on or off.
computer keyboard; the “PTE2” and/or “PTE3” LEDs will
turn on/off respectively.
DEMO9S08JS16—Lab Tutorial
Related parts for DEMO9S08JS16
Image
Part Number
Description
Manufacturer
Datasheet
Request
R

Part Number:
Description:
Manufacturer:
Freescale Semiconductor, Inc
Datasheet:
Part Number:
Description:
Manufacturer:
Freescale Semiconductor, Inc
Datasheet:
Part Number:
Description:
Manufacturer:
Freescale Semiconductor, Inc
Datasheet:
Part Number:
Description:
Manufacturer:
Freescale Semiconductor, Inc
Datasheet:
Part Number:
Description:
Manufacturer:
Freescale Semiconductor, Inc
Datasheet:
Part Number:
Description:
Manufacturer:
Freescale Semiconductor, Inc
Datasheet:
Part Number:
Description:
Manufacturer:
Freescale Semiconductor, Inc
Datasheet:
Part Number:
Description:
Manufacturer:
Freescale Semiconductor, Inc
Datasheet:
Part Number:
Description:
Manufacturer:
Freescale Semiconductor, Inc
Datasheet:
Part Number:
Description:
Manufacturer:
Freescale Semiconductor, Inc
Datasheet:
Part Number:
Description:
Manufacturer:
Freescale Semiconductor, Inc
Datasheet:
Part Number:
Description:
Manufacturer:
Freescale Semiconductor, Inc
Datasheet:
Part Number:
Description:
Manufacturer:
Freescale Semiconductor, Inc
Datasheet:
Part Number:
Description:
Manufacturer:
Freescale Semiconductor, Inc
Datasheet:
Part Number:
Description:
Manufacturer:
Freescale Semiconductor, Inc
Datasheet: