ATSTK526 Atmel, ATSTK526 Datasheet - Page 27
ATSTK526
Manufacturer Part Number
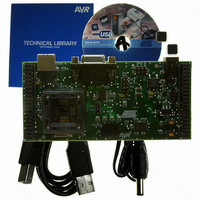
ATSTK526
Description
KIT STARTER FOR AT90USB82/162
Manufacturer
Atmel
Series
AVR®r
Type
MCUr
Specifications of ATSTK526
Contents
Starter Kit Board, Power Supply, Cable and Software
Processor To Be Evaluated
AT90USB82/162
Data Bus Width
8 bit
Interface Type
RS-232, USB
Silicon Manufacturer
Atmel
Core Architecture
AVR
Silicon Core Number
AT90USB82, AT90USB162
Kit Contents
Board Docs
Rohs Compliant
Yes
For Use With/related Products
AT90USB162, AT90USB82
For Use With
ATSTK500 - PROGRAMMER AVR STARTER KIT
Lead Free Status / RoHS Status
Lead free / RoHS Compliant


STK526 rev. B Hardware User Guide
Figure 3-1 . Troubleshooting Guide
The Green “Power-ON”
LED is not on
STK526 does not work
The AT90USB82/162
cannot be programmed
AVR Studio does not
detect the AVR tool used
Problem
No power supply
STK500
Configuration not
respected.
The AVR ISP probe is
not connected
The AVR JTAG ICE
probe is not
connected
The memory lock bits
are programmed
The fuse bits are
wrongly programmed
Programming too fast
with ISP SPI
RS232/USB cable is
not connected, or
power is off
PC COM port is in
use
AVR Studio does not
detect COM port.
Troubleshooting Guide
Reason
Verify the power supply source level
Verify the power supply source selector
Connect the DC power supply source, or
USB interface or STK500.
Connect ISP cable between STK500 and
STK526. Check Parallel Programming
hardware configuration on both STK500
and STK526.
Connect the AVR ISP 6-PIN header to
the correct STK526 ISP header (page
19). Take care of polarity.
Connect the JTAG ICE 10-PIN header to
the correct STK526 JTAG header (page
19). Take care of polarity.
Erase the memory before programming
Check the fuse bits (SPIEN, DWEN if
previous operation was debugging).
Check oscillator settings and make sure
it is not set higher than SPI clock
Connect the RS232 cable (STK500 -
AVR ISP) and check power connections
Connect the USB (JTAG ICE MKII, AVR
ISPmkIIl) and check power connections
Disable other programs that are using
PC COM port.
Change PC COM port
Disable COM port auto-detection in AVR
Studio file menu. Force COM port to the
correct COM port
Solution
Section 3
7709B–AVR–07/08
3-26
Related parts for ATSTK526
Image
Part Number
Description
Manufacturer
Datasheet
Request
R

Part Number:
Description:
DEV KIT FOR AVR/AVR32
Manufacturer:
Atmel
Datasheet:

Part Number:
Description:
INTERVAL AND WIPE/WASH WIPER CONTROL IC WITH DELAY
Manufacturer:
ATMEL Corporation
Datasheet:
Part Number:
Description:
Low-Voltage Voice-Switched IC for Hands-Free Operation
Manufacturer:
ATMEL Corporation
Datasheet:
Part Number:
Description:
MONOLITHIC INTEGRATED FEATUREPHONE CIRCUIT
Manufacturer:
ATMEL Corporation
Datasheet:
Part Number:
Description:
AM-FM Receiver IC U4255BM-M
Manufacturer:
ATMEL Corporation
Datasheet:
Part Number:
Description:
Monolithic Integrated Feature Phone Circuit
Manufacturer:
ATMEL Corporation
Datasheet:
Part Number:
Description:
Multistandard Video-IF and Quasi Parallel Sound Processing
Manufacturer:
ATMEL Corporation
Datasheet:
Part Number:
Description:
High-performance EE PLD
Manufacturer:
ATMEL Corporation
Datasheet:
Part Number:
Description:
8-bit Flash Microcontroller
Manufacturer:
ATMEL Corporation
Datasheet:
Part Number:
Description:
2-Wire Serial EEPROM
Manufacturer:
ATMEL Corporation
Datasheet: