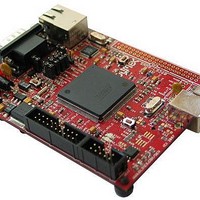
SAM9-L9260 Olimex Ltd., SAM9-L9260 Datasheet - Page 19

SAM9-L9260
Manufacturer Part Number
SAM9-L9260
Description
MCU, MPU & DSP Development Tools DEV BRD FOR AT91SAM9260
Manufacturer
Olimex Ltd.
Datasheet
1.SAM9-L9260.pdf
(25 pages)
Specifications of SAM9-L9260
Processor To Be Evaluated
AT91SAM9260
Data Bus Width
16 bit, 32 bit
Interface Type
RS-232, Ethernet, USB, JTAG
Dimensions
100 mm x 80 mm
Operating Supply Voltage
5 V
Silicon Manufacturer
Atmel
Core Architecture
ARM
Core Sub-architecture
ARM9
Silicon Core Number
AT91S
Silicon Family Name
AT91SAM9xxx
Kit Contents
Board
Rohs Compliant
Yes
Lead Free Status / RoHS Status
Lead free / RoHS Compliant
Other names
1701512 25R5022
SOFTWARE development:
memories. It's based on a custom-built kernel and a Debian 5.0 userland. To use it, connect a
null-modem cable to the board and to a serial port on your computer, start a terminal program
(e.g. HyperTerminal on Windows, minicom on Unix systems) and configure it to use a
115200 baud rate, 8 data bist, 1 stop bit and no parity and no flow control. Then apply power
to the board (use a 5VDC regulated power supply with at least 500mA output current) and
you should see the board start-up messages. The default root password is 'olimex'.
the procedure is as follows:
the computer if needed.
up. Connect an USB cable to the USB_D connector on the board and wait for the board to be
detected (the driver should already be installed by the AT91-ISP v1.12 package, so let
Windows search for it).
at91sam9260_demo_linux_dataflash.bat file from the sam9-l9260-samba directory. After a
while the log file will be displayed and the system should be restored to the default state.
WARNING! This procedure erases the whole NAND flash and the root filesystem will also
be destroyed and reset to its factory defaults in the process.
placed in DATAFLASH and the root filesystem will be placed in NANDFLASH. The reason
to boot from DATAFLASH is an AT91SAM9260 chip errata issue.
exported filesystem...) and use the following command (assuming that the rootjffs2.img file is
available in.)
sam9-l9260:~# flash_eraseall -j /dev/mtd1
sam9-l9260:~# nandwrite -a /dev/mtd1 /rootjffs2.img
You may get some errors about bad blocks not being erased - this is normal and is related to
the priciple of operation of NAND flashes. After the process is completed, reboot the board.
more capacity, faster access, etc. A complete root tree is archived in the sources/sam9-l9260-
rootfs.tar.bz2 file. It can be extracted to an empty ext3 partition on an USB drive or to some
NFS exported directory. Then you need to tell the kernel where to find the root - this is
Overview
The board comes with Linux preloaded in the NAND and DATAFLASH flash
Restoring the default bootloader and kernel
If for some reason you need to restore the default factory configuration of the board,
First install the ATMEL AT91-ISP v1.12 package which comes on the disk. Reboot
Remove the NANDF_E and DF_E jumpers on the SAM9-L9260 board and power it
Close the NANDF_E and DF_E jumpers and run the
After a successful script execution the bootloaders and the Linux uImage will be
Alternative on-board root filesystem restore procedure
Boot-up the board with an alternate root filesystem (e.g. a USB flash drive, NFS
Running with another root filesystem
You may choose to use another media for the root filesystem for various reasons -


