CY8CKIT-001 Cypress Semiconductor Corp, CY8CKIT-001 Datasheet
CY8CKIT-001
Specifications of CY8CKIT-001
Available stocks


Related parts for CY8CKIT-001


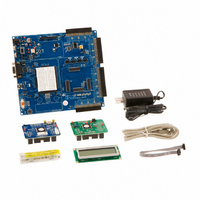
CY8CKIT-001 Summary of contents
Page 1
... PSoC Development Kit Guide ® PSoC3 DVK CY8CKIT-001 Doc. # 001-48651 Rev. ** June 16, 2009 Cypress Semiconductor 198 Champion Court San Jose, CA 95134-1709 Phone (USA): 800.858.1810 Phone (Intnl): 408.943.2600 http://www.cypress.com [+] Feedback ...
Page 2
... Code protection does not mean that we are guaranteeing the product as "unbreakable." Cypress is willing to work with the customer who is concerned about the integrity of their code. Code protection is constantly evolving Cypress are committed to continuously improving the code protection features of our products. 2 CY8CKIT-001 PSoC Development Kit Guide, Doc. # 001-48651 Rev. ** [+] Feedback ...
Page 3
... Counter8_1INT.asm.........................................................................46 3.2 CY8C38 Family Processor Module Example Projects...............................................48 3.2.1 My First PSoC Project....................................................................................48 3.2.1.1 Creating My First PSoC Project .......................................................48 3.2.1.2 Placing and Configuring the PWM ...................................................49 3.2.1.3 Placing and Configuring the Digital Port Hardware..........................50 CY8CKIT-001 PSoC Development Kit Guide, Doc. # 001-48651 Rev [+] Feedback ...
Page 4
... Appendix A. Board Specifications and Layout A.1 PSoC Development Board ........................................................................................ 99 A.1.1 Factory Default Configuration ........................................................................ 99 A.1.1.1 A.1.2 Power Supply Configuration Examples........................................................100 A.1.2.1 A.1.2.2 ii Power Supply ................................................................................. 99 Setting a 5V Supply from VREG ..................................................100 Setting a 3.3V Supply from VREG ...............................................100 CY8CKIT-001 PSoC Development Kit Guide, Doc. # 001-48651 Rev [+] Feedback ...
Page 5
... B.1 MiniProg3 LEDs.......................................................................................................111 B.2 Programming in Powercycle Mode ..........................................................................111 CY8CKIT-001 PSoC Development Kit Guide, Doc. # 001-48651 Rev. ** Setting VDD ANLG as VADJ and VDD DIG as VDD for VDD = 3.3V 101 Setting VDD DIG as VADJ and VDD ANLG as VDD for VDD = 3.3V 101 Setting a 5V Supply from VBUS ...
Page 6
... Contents iv CY8CKIT-001 PSoC Development Kit Guide, Doc. # 001-48651 Rev. ** [+] Feedback ...
Page 7
... Architecture technical reference manuals ❐ Kit release notes ❐ Software release notes ❐ Example project files, firmware, and documentation ❐ CY8CKIT-001 PSoC Development Kit Guide, Doc. # 001-48651 Rev. ** ® Development Kit provides you a common development platform where ® Development Kit includes: 3 [+] Feedback ...
Page 8
... Insert the CD and, using the menu, install the PSoC Development Kit for PSoC3/PSoC5. This option installs all three required software packages. The installers for PSoC programmer and PSoC Creator automatically start before the Kit examples are installed. For each installation, select Typical on the Installation Type page. 4 CY8CKIT-001 PSoC Development Kit Guide, Doc. # 001-48651 Rev. ** [+] Feedback ...
Page 9
... You can access this directory from within PSoC Creator under Help ence Material. Documents include (but are not limited to) PSoC Creator Component Author Guide ■ Warp Verilog Reference Guide ■ Customization API Reference ■ CY8CKIT-001 PSoC Development Kit Guide, Doc. # 001-48651 Rev. ** → Getting Started Introduction → Documentation → Refer- ...
Page 10
... Default Switch and Jumper Settings Jumpers on the CY8CKIT-001 PSoC Development Main Board have a default setting for 3.3V oper- ation. For Default configuration, each of the jumpers must be set according to these instructions. Note: All CY8C29x66 family processor module example projects are configured for 5V. Do configure the board to 5V, before creating the example projects ...
Page 11
... J2-J5 - VDDIO Power Select. Default Position: VDD (upper left two pins) J10 - RS232 Power (Serial Communications). Default Position: Installed J14 - Radio Power. Default Position: Installed J11 - Variable Resistor Power. Default Position: Installed CY8CKIT-001 PSoC Development Kit Guide, Doc. # 001-48651 Rev. ** Introduction 7 [+] Feedback ...
Page 12
... Click the Debugger icon, and then click Next. Displays functionality unique to PSoC Designer, PSoC Creator, or the PSoC device. Displays cautions that are important to the subject. Origin of Description of Change Change AESA New Guide CY8CKIT-001 PSoC Development Kit Guide, Doc. # 001-48651 Rev. ** [+] Feedback ...
Page 13
... Loading My First PSoC Project The CY8CKIT-001 PSoC Development Kit supports projects across the PSoC, PSoC3, and PSoC5 architectures. This section walks you through the high level design process for opening, building, programming, and running your first PSoC projects using this kit. ...
Page 14
... C:\Cypress\CY8CKIT-001\CY8C29 Projects\ 4. Open the folder Example_My_First_PSoC_Project. 5. Double click Example_My_First_PSoC_Project.app. 6. The project opens in the Chip Editor view. All the project files are in the Workspace Explorer. Figure 2-1. Chip Editor View 10 → Open Project/WorkSpace CY8CKIT-001 PSoC Development Kit Guide, Doc. # 001-48651 Rev. ** [+] Feedback ...
Page 15
... Open PSoC Programmer from within PSoC Designer by selecting Program → PSoC Programmer PSoC Programmer, make sure that MiniProg3 is selected in the Port Selection box PSoC Programmer, set Programming Mode to Reset. CY8CKIT-001 PSoC Development Kit Guide, Doc. # 001-48651 Rev. ** Loading My First PSoC Project 11 [+] Feedback ...
Page 16
... Loading My First PSoC3 Project 1. Open PSoC Creator the Start Page, under Start Page Topics expand Kits and Solutions. 3. Under Kits and Solutions, expand PSoC Development Kit. 12 17. CY8CKIT-001 PSoC Development Kit Guide, Doc. # 001-48651 Rev [+] Feedback ...
Page 17
... Click Ex1_LED_with_PWM.cywrk to open the project. 5. Select the directory in which to store the project. 6. After the project opens, you can see the project files in Workspace Explorer. CY8CKIT-001 PSoC Development Kit Guide, Doc. # 001-48651 Rev. ** Loading My First PSoC Project 13 [+] Feedback ...
Page 18
... Figure 2-4. Build Window 2. PSoC Creator builds the project and displays the comments in the Output window. When you see the message “Build Succeeded” you are ready to program the device. Figure 2-5. Output Window 14 CY8CKIT-001 PSoC Development Kit Guide, Doc. # 001-48651 Rev. ** [+] Feedback ...
Page 19
... LED2 blinks about three times a second. 3. For more details regarding this project, review the detailed step-by-step project instructions in First PSoC Project on page CY8CKIT-001 PSoC Development Kit Guide, Doc. # 001-48651 Rev. ** → MiniProg3 from the tree list. ...
Page 20
... Loading My First PSoC Project 16 CY8CKIT-001 PSoC Development Kit Guide, Doc. # 001-48651 Rev. ** [+] Feedback ...
Page 21
... In the New Project window, select the Chip-Level Project. Name the project Example_My_First_PSoC_Project Location, click Browse and navigate to the appropriate directory. Figure 3-1. New Project Window CY8CKIT-001 PSoC Development Kit Guide, Doc. # 001-48651 Rev. ** → New Project. The New Project window opens. 17 ...
Page 22
... The Device Catalog window opens. Click on the PSoC tab, and scroll down to the CY8C29466, CY8C29566,… section. 8. For this project click any device in this section and then click Select. Figure 3-3. Device Catalog Window 18 CY8CKIT-001 PSoC Development Kit Guide, Doc. # 001-48651 Rev. ** [+] Feedback ...
Page 23
... In the User Modules window, expand the PWMs folder. Figure 3-5. User Modules Window 12.In this folder right click on a PWM8 and select place. The User Module (UM) is placed in the first available digital block. CY8CKIT-001 PSoC Development Kit Guide, Doc. # 001-48651 Rev. ** Sample Projects 19 [+] Feedback ...
Page 24
... PWM8_1 UM; the Properties window opens on the left side of the screen. Configure the PWM with the settings as in the following figure. If the Properties window does not appear, click View Figure 3-7. Properties Window 20 → Properties Window. CY8CKIT-001 PSoC Development Kit Guide, Doc. # 001-48651 Rev. ** [+] Feedback ...
Page 25
... PWM CompareOut signal to P0_7. The first step is to configure the Look Up Table (LUT) on Row_0_Output3. 15.Double click the LUT, the Digital Interconnect window opens. 16.In this window enable Row_0_Output_3_Drive_1 to connect to GlobalOutEven_7. Figure 3-8. Digital Interconnect Window 17.Click Close. CY8CKIT-001 PSoC Development Kit Guide, Doc. # 001-48651 Rev. ** Sample Projects 21 [+] Feedback ...
Page 26
... Workspace Explorer Example_My_First_PSoC_Project[Chip] example_my_first_psoc_project - 2 User Modules. Figure 3-9. Workspace Explorer 21.Double click the LED_1 UM and navigate to the Properties window. Configure the LED for P_1_7. 22 → Example_My_First_PSoC_Project[CY8C29x66] → Loadable Configurations CY8CKIT-001 PSoC Development Kit Guide, Doc. # 001-48651 Rev. ** → → [+] Feedback ...
Page 27
... Figure 3-10. .Properties Window 22.Configure the Global Resources window to match the following figure. 23.Open your main.c file and copy the example code located in section existing main.c. main the Workspace Explorer. CY8CKIT-001 PSoC Development Kit Guide, Doc. # 001-48651 Rev. ** Sample Projects 3.1.1.2 on page ...
Page 28
... PSoC Designer as described in the device. 31.Reset the DVK, and observe the blinking LEDs. 32.Save and close the project. 24 → Generate/Build 'Example_My_First_PSoC_Project' Project. Programming My First PSoC Project on page 11 CY8CKIT-001 PSoC Development Kit Guide, Doc. # 001-48651 Rev program [+] Feedback ...
Page 29
... LED_1_Invert();//Switch the state of Software LED, //if on turn it off, //if off turn //End of while(1) }//End of main CY8CKIT-001 PSoC Development Kit Guide, Doc. # 001-48651 Rev VC3 //VC3 = 24MHz/16/16/256 =366.2Hz = High = ROW_0_Output_3 = 100 Output period = (Period+1)*(1/Input Clock) = 101/366.2 = .275sec or 3.6Hz ...
Page 30
... In this case the DS1128 configuration is used. Scroll down in the window to verify that this is the case. Figure 3-12. Select Multi User Module Window 3. Click OK. 4. Verify that the DelSig_1 UM is placed in ASC10. 26 3.1.1.1 on page 17, change the Name of the project to CY8CKIT-001 PSoC Development Kit Guide, Doc. # 001-48651 Rev. ** [+] Feedback ...
Page 31
... In the User Modules window expand the Amplifiers window. Right click PGA, select place. Ensure that the PGA is placed in ACB00 the User Modules window expand Misc Digital, Right click LCD and click place. 7. Double click PGA_1 and configure the properties to match this figure. CY8CKIT-001 PSoC Development Kit Guide, Doc. # 001-48651 Rev. ** Sample Projects 27 [+] Feedback ...
Page 32
... Sample Projects 8. Double click DelSig_1 and configure the properties to match this figure. 9. Double click LCD_1 and configure the properties to match this figure. 28 CY8CKIT-001 PSoC Development Kit Guide, Doc. # 001-48651 Rev. ** [+] Feedback ...
Page 33
... Global Resources to match the following figure. 11. Ensure that AnalogColumn_InputMUX_0 is connected to Port_0_1 not configured for this port, double click the MUX and choose Port_0_1. CY8CKIT-001 PSoC Development Kit Guide, Doc. # 001-48651 Rev. ** Sample Projects 29 [+] Feedback ...
Page 34
... LCD. 22.Save and close the project. 30 → Generate/Build 'Example_ADC_to_LCD' Project. Programming My First PSoC Project on page 11 CY8CKIT-001 PSoC Development Kit Guide, Doc. # 001-48651 Rev. ** 3.1.2.2 on page 31 to the to program [+] Feedback ...
Page 35
... Holds the integer ADC result void main() { PGA_1_Start(PGA_1_HIGHPOWER);//Initialize the PGA, PGA used to buffer DelSig_1_Start(DelSig_1_HIGHPOWER); //Initialize the ADC LCD_1_Start(); CY8CKIT-001 PSoC Development Kit Guide, Doc. # 001-48651 Rev. ** (P0.1) // VC1 = 24MHz/12 = 2MHz *Note, this parameter is unused *Note, this parameter is unused // part specific constants and macros // PSoC API definitions for all User Modules //input from the ...
Page 36
... ADC LCD_1_Position(0,9); LCD_1_PrHexInt(wADCResult); }//End of while(1) }//End of main 32 //Set the LCD to (Row=0,Column=0) //Start gathering conversions from the ADC //Wait for ADC data to be ready //Set LCD to //Print ADC result on LCD CY8CKIT-001 PSoC Development Kit Guide, Doc. # 001-48651 Rev. ** (Row=0,Column=9) [+] Feedback ...
Page 37
... DS232 and choose place. A window appears with multiple options for the DelSig UM. In this case the DS232 configuration is used. Scroll down in the window for verification. Figure 3-13. Select Multi User Module Window 3. Click OK. CY8CKIT-001 PSoC Development Kit Guide, Doc. # 001-48651 Rev. ** 3.1.1.1 on page 17, change the Name of the project to Sample Projects ...
Page 38
... Complete this step twice to place two Counter8s the User Modules window expand Digital Comm, right click TX8, and click place the User Modules window expand DACs, right click DAC6, and click place. 34 CY8CKIT-001 PSoC Development Kit Guide, Doc. # 001-48651 Rev. ** [+] Feedback ...
Page 39
... UMs so that they match the configuration shown in this figure. CY8CKIT-001 PSoC Development Kit Guide, Doc. # 001-48651 Rev. ** Sample Projects Counter8_1 Counter8_2 TX8_1 PGA_1 DelSig_1 DAC6_1 35 [+] Feedback ...
Page 40
... Sample Projects 11. Double click on DelSig_1 and configure it to match this figure. 12.Double click PGA_1 and configure it to match this figure. 13.Double click DAC6_1 and configure it to match this figure. 36 CY8CKIT-001 PSoC Development Kit Guide, Doc. # 001-48651 Rev. ** [+] Feedback ...
Page 41
... LCD_1 and configure it to match this figure. 15.Double click on Counter8_1 and configure it to match this following figure. 16.Double click Counter8_2 and configure it to match this figure. CY8CKIT-001 PSoC Development Kit Guide, Doc. # 001-48651 Rev. ** Sample Projects 37 [+] Feedback ...
Page 42
... Sample Projects 17.Double click TX8_1 and configure it to match this figure. 18.Double click RO2[0] LUT, enable Row_2_Output_0_Drive_1 to connect GlobalOutEven_4. Figure 3-14. Digital Interconnect Window 38 CY8CKIT-001 PSoC Development Kit Guide, Doc. # 001-48651 Rev. ** [+] Feedback ...
Page 43
... GlobalOutEven_4. A window appears; in this window configure PIN for Port_0_4. 20.Click OK to continue. CY8CKIT-001 PSoC Development Kit Guide, Doc. # 001-48651 Rev. ** Sample Projects 39 [+] Feedback ...
Page 44
... Sample Projects 21.Click AnalogOutBuf_1 and configure it for Port_0_5. 22.Verify that AnalogColumn_InputMUX_0 is connected to Port_0_1 not configured for this port, double click the MUX and choose Port_0_1. 40 CY8CKIT-001 PSoC Development Kit Guide, Doc. # 001-48651 Rev. ** [+] Feedback ...
Page 45
... AnalogColumn_Clock_0, is connected to VC2 not, double click the MUX and chose VC2. 24.Configure Global Resources to match the following figure. CY8CKIT-001 PSoC Development Kit Guide, Doc. # 001-48651 Rev. ** Sample Projects 41 [+] Feedback ...
Page 46
... Library Source Files. Copy the example 3.1.3.3 on page 46 to the existing Counter8_1INT.asm. → Generate/Build Programming My First PSoC Project on page 11 CY8CKIT-001 PSoC Development Kit Guide, Doc. # 001-48651 Rev. ** 3.1.3.2 on page 43 to the to program [+] Feedback ...
Page 47
... Value = 255 Clock * ClockSync * Enable * CompareOut * TerminalCountOut = None CY8CKIT-001 PSoC Development Kit Guide, Doc. # 001-48651 Rev. ** (P0.1) *Note this parameter is not used *Note this parameter is not used = VC2 // VC2 = 24MHz/16/16 = 250kHz = Sync to SysClk = High = None Sample Projects 43 [+] Feedback ...
Page 48
... High = None = 38 = 0*Note this parameter is not used = Less Than or Equal = Terminal Count = Normal = Row_2_Output_1 (From Counter8_1) = Row_2_Output_0 = Sync to SysClk = None // part specific constants and macros // PSoC API definitions for all User Modules CY8CKIT-001 PSoC Development Kit Guide, Doc. # 001-48651 Rev. ** [+] Feedback ...
Page 49
... TX8_1_PutSHexByte(bADCvalue); TX8_1_PutCRLF(); } } //end of while(1) } //End of Main CY8CKIT-001 PSoC Development Kit Guide, Doc. # 001-48651 Rev. ** //Enable the counter used for DAC update rate //Enable DAC update interrupt //Enable counter for TX8 clock rate divider //Start the TX8 UM with no parity (baud rate // = 38400) ...
Page 50
... Stores last table position index export _bTablePos ;------------------------ ; Includes ;------------------------ ;------------------------ ; Constant Definitions ;------------------------ ;------------------------ ; Variable Allocation ;------------------------ area bss(RAM) bTablePos:blk 1 _bTablePos: ;--------------------------------------------------- ; Insert your custom declarations above this banner ;--------------------------------------------------- ;@PSoC_UserCode_END@ (Do not change this line.) AREA UserModules (ROM, REL) 46 CY8CKIT-001 PSoC Development Kit Guide, Doc. # 001-48651 Rev. ** [+] Feedback ...
Page 51
... Insert your custom code above this banner ;--------------------------------------------------- ;@PSoC_UserCode_END@ (Do not change this line.) reti ; end of file Counter8_1INT.asm CY8CKIT-001 PSoC Development Kit Guide, Doc. # 001-48651 Rev. ** ;Go to the next element in the table ;If we are at the end go back to the beginning Sample Projects 47 [+] Feedback ...
Page 52
... By default, the design window opens TopDesign.cysch. This is the project's schematic entry file within PSoC Creator. 48 → System → Digital Port) → Digital Functions → PWM) → System → Clock) CY8CKIT-001 PSoC Development Kit Guide, Doc. # 001-48651 Rev. ** button and [+] Feedback ...
Page 53
... PWM Mode: One Output ❐ Period: 100 ❐ CMP Value 1: 50 ❐ CMP Value Type 1: Less or Equal ❐ Figure 3-17. PWM Component Configuration CY8CKIT-001 PSoC Development Kit Guide, Doc. # 001-48651 Rev. ** Sample Projects → Digital → Functions → PWM) to- 49 [+] Feedback ...
Page 54
... AccessMode: PortAccessMode_HW ❐ Direction: PortDirection_Output ❐ Width: 1 ❐ Figure 3-18. PWM_OUT Component Configuration Pins Tab Pin Mode: CMOS_Out ❐ Leave remaining parameters set to their default values ❐ 50 → CY8CKIT-001 PSoC Development Kit Guide, Doc. # 001-48651 Rev. ** System → Digital Port). [+] Feedback ...
Page 55
... Double click the dPort_1 component in the schematic to open the configuration window. 3. Configure the digital port: Basic Tab Name: LED ❐ AccessMode: PortAccessMode_SW ❐ Direction: PortDirection_Output ❐ Width: 1 ❐ Figure 3-20. LED Component Configuration CY8CKIT-001 PSoC Development Kit Guide, Doc. # 001-48651 Rev. ** Sample Projects → System → Digital Port). 51 [+] Feedback ...
Page 56
... PWM component the digital port → → Digital Logic → → System CY8CKIT-001 PSoC Development Kit Guide, Doc. # 001-48651 Rev. ** Digital Logic → Logic High) to the → Logic Low) to the Digital Logic → Logic High) to the → ...
Page 57
... Configuring the Pins 1. From the Workspace Explorer, double click the Ex1_LED_with_PWM.cydwr file (see Figure 3-24 on page 2. Click the Pins tab. 3. Select pin P1[6] for PWM_OUT. 4. Select pin P1[7] for LED. CY8CKIT-001 PSoC Development Kit Guide, Doc. # 001-48651 Rev. ** Figure 3-23. 54). Sample Projects 53 ...
Page 58
... Initially set LED to off */ PWMclock_Enable(); /* Start the clock */ PWM_Start(); /* Following loop does software blinking of LED connected to P0.1 */ while (1) { CyDelay(MS_DELAY Enable PWM */ /* Have software loop blink control CY8CKIT-001 PSoC Development Kit Guide, Doc. # 001-48651 Rev [+] Feedback ...
Page 59
... In the New Project window, select the Empty PSoC3 Design template and Name the project Ex2_ADC_to_LCD Location, type the path where you want to save the project, or click appropriate directory. CY8CKIT-001 PSoC Development Kit Guide, Doc. # 001-48651 Rev Toggle LED setting between low and high */ Programming a Device on page 15 → ...
Page 60
... Start of Conversion: Software ❐ For more information about what the parameters mean, click the Data Sheet button in the config- uration window. Figure 3-25. ADC Component Configuration 56 CY8CKIT-001 PSoC Development Kit Guide, Doc. # 001-48651 Rev. ** → Analog → ADC → [+] Feedback ...
Page 61
... Include ASCII to Number Conversion Routines: Check box ❐ For more information about what the parameters mean, click the Data Sheet button in the config- uration window. CY8CKIT-001 PSoC Development Kit Guide, Doc. # 001-48651 Rev. ** Sample Projects → → System Analog Port). ...
Page 62
... Figure 3-28. Connected Components 3.2.2.6 Configuring the Pins 1. From the Workspace Explorer, double click the Ex2_ADC_to_LCD.cydwr file. 2. Click the Pins tab. 3. Select pins P2[6:0] for CharLCD. 4. Select pin P0[7] for POT. 58 Figure 3-28. CY8CKIT-001 PSoC Development Kit Guide, Doc. # 001-48651 Rev. ** [+] Feedback ...
Page 63
... CY8CKIT-001 PSoC Development Kit Guide, Doc. # 001-48651 Rev. ** Sample Projects 59 [+] Feedback ...
Page 64
... Initializes VDAC8 with default values */ /* Enable Analog Buffer and sets power level */ /* Enable UART */ /* Bursts are one byte each */ 1, /* One request per burst */ 0, /* Upper 16 bits of the source address are 0); /* Upper 16 bits of the destination address CY8CKIT-001 PSoC Development Kit Guide, Doc. # 001-48651 Rev. ** [+] Feedback ...
Page 65
... Function Name: UpdateDisplay ******************************************************************************** * * Summary: * Print voltage raw count result to the LCD. * necessary. The voltageRawCount parameter is also updated for use in other * functions Parameters: CY8CKIT-001 PSoC Development Kit Guide, Doc. # 001-48651 Rev. ** myTd, TD_INC_SRC_ADR ); /* Configure the TD */ Clears some characters if Sample Projects 61 [+] Feedback ...
Page 66
... Configuring and Programming the PSoC Development Board 1. Disconnect power to the board. 2. Configure the DVK bread board SW3 to 3.3V. 62 "); /* Clear last characters */ "); /* Clear last characters */ /* TX converted first nibble */ /* h for hexadecimal and carriage return */ CY8CKIT-001 PSoC Development Kit Guide, Doc. # 001-48651 Rev. ** [+] Feedback ...
Page 67
... In Location, type the path where you want to save the project, or click appropriate directory default, the design window opens TopDesign.cysch. This is the project's schematic entry file within PSoC Creator. CY8CKIT-001 PSoC Development Kit Guide, Doc. # 001-48651 Rev. ** Programming a Device on page 15 → Analog → ...
Page 68
... Start of Conversion: Software ❐ For more information about what the parameters mean, click the Data Sheet button in the config- uration window. Figure 3-30. Delta Sigma ADC Component Configuration 64 CY8CKIT-001 PSoC Development Kit Guide, Doc. # 001-48651 Rev. ** → → → Analog ADC ...
Page 69
... Include ASCII to Number Conversion Routines: Check box ❐ For more information about what the parameters mean, click the Data Sheet button in the config- uration window. CY8CKIT-001 PSoC Development Kit Guide, Doc. # 001-48651 Rev. ** Sample Projects → → System Analog Port) → ...
Page 70
... Strobe_Mode: Register_Write ❐ VDAC_Range: Range_4_Volt ❐ VDAC_Speed: LowSpeed ❐ For more information about what the parameters mean, click the Data Sheet button in the config- uration window. 66 → CY8CKIT-001 PSoC Development Kit Guide, Doc. # 001-48651 Rev. ** Analog → DAC → Voltage [+] Feedback ...
Page 71
... Power: High Power ❐ For more information about what the parameters mean, click the Data Sheet button in the config- uration window. Figure 3-34. Opamp Component Configuration CY8CKIT-001 PSoC Development Kit Guide, Doc. # 001-48651 Rev. ** Sample Projects → Analog → Amplifiers → ...
Page 72
... Leave the remaining parameters to default ❐ For more information about what the parameters mean, click the Data Sheet button in the config- uration window. 68 → System → Communications CY8CKIT-001 PSoC Development Kit Guide, Doc. # 001-48651 Rev. ** → Analog Port) → UART) [+] Feedback ...
Page 73
... Configure the digital port: Basic Tab Name: TX_OUT ❐ AccessMode: PortAccessMode_HW ❐ Direction: PortDirection:_Output ❐ Width: 1 ❐ Figure 3-37. TX_OUT Component Configuration Pins Tab Pin Mode: CMOS_Out ❐ CY8CKIT-001 PSoC Development Kit Guide, Doc. # 001-48651 Rev. ** Sample Projects → System → Digital Port) 69 [+] Feedback ...
Page 74
... Leave the remaining parameters to default ❐ For more information about what the parameters mean, click the Data Sheet button in the config- uration window. Figure 3-39. DMA Component Configuration 70 → System CY8CKIT-001 PSoC Development Kit Guide, Doc. # 001-48651 Rev. ** → DMA) [+] Feedback ...
Page 75
... Right click the LED analog port, select the Shape menu option and then Flip Horizontal. This allows the LED pin to line up with the analog buffer. 8. When complete the schematic looks like CY8CKIT-001 PSoC Development Kit Guide, Doc. # 001-48651 Rev. ** → → ...
Page 76
... From the Workspace Explorer, open the Ex3_ADC_to_UART_with_DAC.cydwr file. 2. Click the Pins tab. 3. Select pins P2[6:0] for CharLCD 4. Select pin P0[7] for POT 5. Select pin P1[6] for LED 6. Select pin P1[2] for TX_OUT Figure 3-42. Pin Assignments 72 CY8CKIT-001 PSoC Development Kit Guide, Doc. # 001-48651 Rev. ** [+] Feedback ...
Page 77
... In the main loop, it starts and waits for an ADC conversion, then * it displays the ADC raw count to the LCD, transmits the raw count serially, * and sets the DMA clock divider proportional to the raw count. * CY8CKIT-001 PSoC Development Kit Guide, Doc. # 001-48651 Rev. ** Sample Projects 73 [+] Feedback ...
Page 78
... Enable Analog Buffer and sets power level */ /* Enable UART */ /* Bursts are one byte each */ 1, /* One request per burst */ 0, /* Upper 16 bits of the source address are 0); /* Upper 16 bits of the destination address myTd, TD_INC_SRC_ADR ); /* Configure the TD */ CY8CKIT-001 PSoC Development Kit Guide, Doc. # 001-48651 Rev. ** [+] Feedback ...
Page 79
... CharLCD_Position(0,10); /* Move the cursor to Row 0, Column 10 */ CharLCD_PrintString(" } else if (voltageRawCount[0] < 100) { CharLCD_Position(0,11); /* Move the cursor to Row 0, Column 11 */ CharLCD_PrintString(" /******************************************************************************* * Function Name: TxHex ******************************************************************************** * CY8CKIT-001 PSoC Development Kit Guide, Doc. # 001-48651 Rev. ** Clears some characters if "); /* Clear last characters */ "); /* Clear last characters */ Sample Projects 75 [+] Feedback ...
Page 80
... Install a terminal application such as TeraTerm or HyperTerminal with these setup parameters: Baud Rate: 9600 ❐ Data: 8-bit ❐ Parity: none ❐ Stop: 1-bit ❐ Flow Control: none ❐ converted first nibble */ /* h for hexadecimal and carriage return */ CY8CKIT-001 PSoC Development Kit Guide, Doc. # 001-48651 Rev. ** [+] Feedback ...
Page 81
... Drag-and-drop a USBFS component from the Components Catalog to the workspace. 2. Double click the USBFS_1 component. 3. Name the component USBFS. 4. Select the HID Descriptor tab. CY8CKIT-001 PSoC Development Kit Guide, Doc. # 001-48651 Rev. ** Programming a Device on page 15 to program the device. Sample Projects and navigate to the ...
Page 82
... Sample Projects Figure 3-44. USBFS Component Configuration 5. Click to import a report. 6. Browse the Kit CD and open the XML descriptor file, USB_HID_Example.xml. Figure 3-45. HID Descriptor Configuration 7. Select the String Descriptor tab. 78 CY8CKIT-001 PSoC Development Kit Guide, Doc. # 001-48651 Rev. ** [+] Feedback ...
Page 83
... Device Descriptor tab. 16.Select Device Descriptor 17.Set the Product ID to F11E. 18.Set the Manufacturing String to Cypress Semiconductor. 19.Set the Product String to PSoC Development Kit. Figure 3-47. Device Descriptor Configuration CY8CKIT-001 PSoC Development Kit Guide, Doc. # 001-48651 Rev. ** Sample Projects 79 [+] Feedback ...
Page 84
... Alternate Setting 0 23.Set Class to HID. Figure 3-49. Interface Descriptor Configuration 24.Select HID Class Descriptor. 25.Set HID Report to Keyboard w/LED Feature Report. 26.Select Endpoint Descriptor. 27.Set Direction to IN and Transfer Type to INT. 80 CY8CKIT-001 PSoC Development Kit Guide, Doc. # 001-48651 Rev. ** [+] Feedback ...
Page 85
... Drag-and-drop a Digital Port component 2. Configure in this manner. Basic Tab Name: SW ❐ Width: 1 ❐ Figure 3-50. SW Digital Port Configuration Pins Tab Pin Mode: ResPull_Up. ❐ Figure 3-51. Pins - SW Digital Port Configuration 3. Click OK. CY8CKIT-001 PSoC Development Kit Guide, Doc. # 001-48651 Rev. ** Sample Projects 81 [+] Feedback ...
Page 86
... Width: 1 ❐ Figure 3-52. LED Component Configuration Pins Tab Pin Mode: CMOS_Out ❐ Figure 3-53. Pins - LED Component Configuration 3. From the Workspace Explorer, open the Ex4_USB_HID.cydwr window and select the Clocks tab. 82 CY8CKIT-001 PSoC Development Kit Guide, Doc. # 001-48651 Rev. ** [+] Feedback ...
Page 87
... Figure 3-54. Configure the Builtin Clocks 9. Click OK. 3.2.4.5 Configuring the Pins 1. Click the Pins tab. Assign USBFS_dp to P15[6] ❐ Assign USBFS_dm to P15[7] ❐ Assign LED to P1[6] ❐ Assign SW to P1[5] ❐ Figure 3-55. Pin Assignments CY8CKIT-001 PSoC Development Kit Guide, Doc. # 001-48651 Rev. ** Sample Projects 83 [+] Feedback ...
Page 88
... Data array for the keyboard device endpoint */ uint8 keyboardData[] = {0,0,0,0,0,0,0,0}; /* Keyboard scan codes for the cypress website (“www.cypress.com<cr>”) */ uint8 cypressWebsiteCharSequence 0x1A, 0x1A, 0x1A, 0x37, 0x06, 0x1C, 84 0x15u 0x28u 0x00u 0x01u 0x01u 0x00u 0x08u 0x02u CY8CKIT-001 PSoC Development Kit Guide, Doc. # 001-48651 Rev. ** [+] Feedback ...
Page 89
... TRUE; } return FALSE; CY8CKIT-001 PSoC Development Kit Guide, Doc. # 001-48651 Rev. ** 0x13, 0x15, 0x08, 0x16, 0x16, 0x37, 0x06, 0x12, 0x10, 0x28}; /* Set port pin for button (SW1 Set/clear (toggle) the LED port pin */ ...
Page 90
... GetAckLoadEp(keyboardData); /* Send USB keyboard data */ /* While Windows modifier key is down send r key, r make */ keyboardData[KEY_DATA_INDEX] = LETTER_R; GetAckLoadEp(keyboardData); /* Send USB keyboard data */ /* Send up keys for both Windows modifier key and r key */ keyboardData[KEY_DATA_INDEX] = KEY_RELEASE break */ 86 CY8CKIT-001 PSoC Development Kit Guide, Doc. # 001-48651 Rev. ** [+] Feedback ...
Page 91
... When button SW1 is pressed, the Windows Run window opens and the keyboard key sequence for the Cypress website is sent to open the Cypress website. 9. Save and close the project. CY8CKIT-001 PSoC Development Kit Guide, Doc. # 001-48651 Rev. ** Programming a Device on page 15 to program the ...
Page 92
... Drag-and-drop a CapSense component from the Component Catalog to the workspace. 2. Double click the CapSense_1 component 3. Configure it in this manner. Figure 3-56. CapSense Component Configuration 4. Name the component CapSense. 5. Select IDAC sinking. 6. Select the Buttons tab. 88 CY8CKIT-001 PSoC Development Kit Guide, Doc. # 001-48651 Rev. ** and navigate to the [+] Feedback ...
Page 93
... Type these names for button one, B1 and button two the Button Name field. Figure 3-58. B1 Button Configuration 8. Select the Sliders tab. 9. Enter Position for the Slider Name. 10.Select Linear for Type. 11. Enter 5 for Number of Elements. 12.Enter 80 for Resolution. CY8CKIT-001 PSoC Development Kit Guide, Doc. # 001-48651 Rev. ** Sample Projects 89 [+] Feedback ...
Page 94
... UDB from the Prescaler drop down list. This enables the Prescaler Period in Scan Slots tab. Figure 3-60. Clock Source Tab 15.Select the Scan Slots tab using the right arrow. Figure 3-61. Click Right Arrow 90 CY8CKIT-001 PSoC Development Kit Guide, Doc. # 001-48651 Rev. ** [+] Feedback ...
Page 95
... LS_Position_e0 through LS_Position_e4 in the Scan Slots tab: Select Custom ❐ Prescaler Period: 12 ❐ Resolution: 10 bits ❐ IDAC Range: 3 ❐ Connect Inactive Sensors: Ground ❐ Scan Speed: Normal ❐ IDAC Setting: 60 ❐ CY8CKIT-001 PSoC Development Kit Guide, Doc. # 001-48651 Rev. ** Sample Projects 91 [+] Feedback ...
Page 96
... Placing and Configuring Character LCD 1. Drag-and-drop a Character LCD component from the Component Catalog to the workspace. 2. Double click the LCD_Char_1 component. 3. Set the parameter LCD Custom Character Set to Horizontal Bargraph. Figure 3-64. Horizontal Bargraph Configuration 92 CY8CKIT-001 PSoC Development Kit Guide, Doc. # 001-48651 Rev. ** [+] Feedback ...
Page 97
... AccessMode: PortAccessMode_SW ❐ Contiguous: true ❐ Direction: PortDirection_Output ❐ PowerOnResetState: PortPORState_InDisabledOutHiZ ❐ StandardLogic: PortStandardLogic_CMOS ❐ UseInterrupt: false ❐ Width: 1 ❐ Figure 3-65. LED Configuration Pins Tab ❐ Pin Mode: CMOS_Out ❐ CY8CKIT-001 PSoC Development Kit Guide, Doc. # 001-48651 Rev. ** Sample Projects 93 [+] Feedback ...
Page 98
... Position_e2 to P0[2] ❐ Position_e3 to P0[3] ❐ Position_e4 to P0[4] ❐ LED1 to P1[6] ❐ LED2 to P1[7] ❐ CharLCD to P2[0] to P2[6] (Drag it to P2[0] and PSoC Creator assigns the pin correctly.) ❐ Figure 3-67. Pin Assignment 94 CY8CKIT-001 PSoC Development Kit Guide, Doc. # 001-48651 Rev. ** [+] Feedback ...
Page 99
... CapSense slots (slider slots and buttons), gets the state of the * buttons and slider and updates the LCD with the current state Parameters: * void * * Return: * void * *******************************************************************************/ void main() { CY8CKIT-001 PSoC Development Kit Guide, Doc. # 001-48651 Rev LCD row LCD row LCD column 0 */ " " "Button1 " " Button2" "Button1 Button2" ...
Page 100
... UpdateButtonState(uint8 slot_1, uint8 slot_2) { CharLCD_Position(ROW_0,COLUMN_0); /* Check the state of the buttons and update the LCD and LEDs*/ if (slot_1 && slot_2) { CharLCD_PrintString(BUTTON_1_2_STR); LED1_Write(LED_ON); /* Set the LED */ LED2_Write(LED_ON); /* Set the LED */ } else if (slot_1 || slot_2 (slot_1) 96 CY8CKIT-001 PSoC Development Kit Guide, Doc. # 001-48651 Rev. ** [+] Feedback ...
Page 101
... From the Build menu, select Build CapSense. PSoC Creator builds the project and displays the comments in the Output dialog box. When you see the message “Build Succeeded” the build is complete. CY8CKIT-001 PSoC Development Kit Guide, Doc. # 001-48651 Rev. ** Sample Projects 97 ...
Page 102
... Button2 in the top row of the LCD display. The bottom row of the LCD displays the Slider position with a Horizontal Bar graph. 7. Save and close the project. 98 Programming a Device on page 15 CY8CKIT-001 PSoC Development Kit Guide, Doc. # 001-48651 Rev program the device. [+] Feedback ...
Page 103
... VDDIO - This is power derived from either VDD or VADJ used to power digital I/O on the PSoC device. There are four sections of GPIO, which can be powered to 5V, 3.3V, or VADJ using four headers. It enables the user to power the PSoC GPIOs at different voltages. CY8CKIT-001 PSoC Development Kit Guide, Doc. # 001-48651 Rev [+] Feedback ...
Page 104
... FOR VDD ANLG SELECT VDD AS SOURCE FOR VDD DIG SELECT VREG AS SOURCE MOVE VDD SELECT SWITCH TO 3.3V SELECT VDD AS SOURCE FOR VDD ANLG SELECT VDD AS SOURCE FOR VDD DIG SELECT VREG AS SOURCE CY8CKIT-001 PSoC Development Kit Guide, Doc. # 001-48651 Rev. ** [+] Feedback ...
Page 105
... Place the jumper on J7 header to select VADJ as source for VDD DIG. Figure A-4. Setting VDD DIG as VADJ and VDD ANLG as VDD for VDD = 3.3V This helps to separate the digital supply from the analog supply and VDD. CY8CKIT-001 PSoC Development Kit Guide, Doc. # 001-48651 Rev. ** Board Specifications and Layout MOVE VDD SELECT SWITCH TO 3 ...
Page 106
... FOR VDD ANLG SELECT VDD AS SOURCE FOR VDD DIG SELECT VBUS AS SOURCE MOVE VDD SELECT SWITCH TO 3.3V SELECT VDD AS SOURCE FOR VDD ANLG SELECT VDD AS SOURCE FOR VDD DIG SELECT VBUS AS SOURCE CY8CKIT-001 PSoC Development Kit Guide, Doc. # 001-48651 Rev. ** [+] Feedback ...
Page 107
... VADJ voltage between 1.25V and 2.3V when the VDD select switch is in the 3.3V position. When the VDD select switch is in the 5V position, turning this variable resistor swings the VADJ voltage between 1.25V and 3.9V. CY8CKIT-001 PSoC Development Kit Guide, Doc. # 001-48651 Rev. ** Board Specifications and Layout 103 ...
Page 108
... Header J10 must be jumpered in order to use the serial communications port. Placing a jumper on J10 provides VDD power to the RS232 transceiver. This power can be either 3.3V or 5V, depending on which the position of the VDD select switch. 104 J10-RS232 POWER CAPSENSE SLIDER CY8CKIT-001 PSoC Development Kit Guide, Doc. # 001-48651 Rev. ** SW1 SW2 CAPSENSE BUTTONS [+] Feedback ...
Page 109
... LCD. The header J12 must be jumpered for the LCD Module to be powered. If J12 is not jum- pered, it removes power from level translator. If the LCD module is removed, the receptacle pins of P18 can be used as port 2. CY8CKIT-001 PSoC Development Kit Guide, Doc. # 001-48651 Rev. ** Board Specifications and Layout 105 ...
Page 110
... One side of the switch is tied to the XRES pin of the processor module socket. The other end of the switch is tied to the HW_RESET pin of the processor module socket. Doing this allows the module 106 VDDIO_1=3.3V VDDIO_2=VADJ CY8CKIT-001 PSoC Development Kit Guide, Doc. # 001-48651 Rev. ** Figure A-7. [+] Feedback ...
Page 111
... The full speed USB D+ and D- signals are also connected to one of the sockets. Processor reset is connected to P1. Any “no connect” pins are brought out to surface mount test pads. Figure A-8. Mechanical Layout Details for Processor Module Connector CY8CKIT-001 PSoC Development Kit Guide, Doc. # 001-48651 Rev. ** Board Specifications and Layout 107 ...
Page 112
... The fourth is simply I/O and ground exclusively. These sockets can be used to join the processor module I/Os with external I/Os through the use of daughter boards. 108 Port C Port A Port A‘ Port B CY8CKIT-001 PSoC Development Kit Guide, Doc. # 001-48651 Rev. ** [+] Feedback ...
Page 113
... I/Os as well as ground and voltage pins. It can be used to join processor module I/Os port7, port8, and port9 with external I/Os through the use of daughter boards used for devices with a high I/O count. CY8CKIT-001 PSoC Development Kit Guide, Doc. # 001-48651 Rev. ** Board Specifications and Layout 109 ...
Page 114
... Board Specifications and Layout 110 CY8CKIT-001 PSoC Development Kit Guide, Doc. # 001-48651 Rev. ** [+] Feedback ...
Page 115
... You should not perform powercycle mode programming with PSoC Programmer. This is due to the way the module is designed. VTARG of the MiniProg3 is wired exclusively to VDDIO1 of the chip on the module. In order for powercycle programming to work, VTARG would need to be wired to VDDD. CY8CKIT-001 PSoC Development Kit Guide, Doc. # 001-48651 Rev. ** 111 [+] Feedback ...
Page 116
... MiniProg3 112 CY8CKIT-001 PSoC Development Kit Guide, Doc. # 001-48651 Rev. ** [+] Feedback ...