TWR-MCF51CN-KIT Freescale Semiconductor, TWR-MCF51CN-KIT Datasheet - Page 3
TWR-MCF51CN-KIT
Manufacturer Part Number
TWR-MCF51CN-KIT
Description
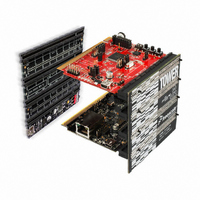
KIT TOWER BOARD/SERIAL/ELEVATOR
Manufacturer
Freescale Semiconductor
Series
ColdFire®, Flexis™r
Type
MCUr
Datasheets
1.TWR-ELEV.pdf
(48 pages)
2.TWR-ELEV.pdf
(4 pages)
3.TWR-ELEV.pdf
(4 pages)
4.TWR-MCF51CN-KIT.pdf
(4 pages)
Specifications of TWR-MCF51CN-KIT
Contents
4 Boards, Cable, DVD
Processor To Be Evaluated
MCF51CN128
Data Bus Width
8 bit, 16 bit, 32 bit
Interface Type
RS-232, RS-485, Ethernet, USB, CAN
Silicon Manufacturer
Freescale
Core Architecture
Coldfire
Core Sub-architecture
Coldfire V1
Silicon Core Number
MCF51
Silicon Family Name
MCF51CN
Kit Contents
Board
Rohs Compliant
Yes
For Use With/related Products
Freescale Tower System, MCF51CN128
For Use With
TWR-ELEV - TOWER ELEVATOR BOARDS HARDWARE
Lead Free Status / RoHS Status
Lead free / RoHS Compliant


MCF51CN128—Lab Tutorials 3 & 4
Low-Power e-Mail-
Enabled Security,
Freescale MQX RTOS
for MCF51CN128
Introduction
This lab demonstrates the MCF51CN128
Tower System by sending out an e-mail
when one of the push buttons are pressed.
It also updates itself to the current time
using the SNTP protocol, and acquires
an IP address off a network via DHCP.
It will conserve power in Stop3 sleep
mode and wake at the press of a button.
Please note that this lab requires basic
knowledge about your network setup
and e-mail configuration. These values
will vary from network to network, and
not all networks will have an e-mail server
or SNTP server. Also some corporate
networks are located behind a firewall or
proxy, which might inhibit the functionality
of this lab. Please contact your system
administrator for more information on
your network configuration.
Figure: Software Flow Chart
Demonstrates
• MQX RTCS TCP/IP network stack
• DHCP functionality
• SNTP functionality
Start RTCS and setup
Get current time from
Get current time from
Lab Tutorials for TWR-MCF51CN-KIT
Sleep in Stop3 mode
network parameters
setup KBI interrupt
Initialize program
until button press
Send e-mail alert
initialize IO and
LAB
3
“Main” task
SNTP server
parameters,
SNTP server
Autostart
• DNS functionality
• Sockets
Step by Step Instructions
1. Install CodeWarrior for Microcontrollers 6.2
2. Construct the TWR-MCF51CN-KIT as
3. The first time you connect the USB debugger
4. If you did not install the MQX project in
5. Open the Lab Project by selecting the File
6. In the project pane, select “SecEmail -
7. Open up the security.h file in the
Figure 2: MQX Source Tree
(30 day evaluation version available, Basic or
higher needed to run MQX lab tutorials) then
install CodeWarrior 6.2.2 patch. Then open
CodeWarrior.
instructed in Step 2 of Lab 1. Then make
the following connections from the
TWR-MCF51CN-KIT to the computer.
See Figure 1 on reverse side.
cable to your PC, Windows will install a driver
for the debugger. Follow the prompts to
automatically detect and install the driver.
the default C:\Program Files\Freescale\
Freescale MQX 3.2\ directory during
installation, you must first recompile the
MQX libraries to reflect the new path name.
See the release notes for more information
before continuing on with the lab.
> Open menu, and opening: C:\Program
Files\Freescale\Freescale MQX 3.2\demo\
security_email\codewarrior\secemail_
twrmcf51cn.mcp
OSBDM Debug Int. Flash” build target.
Sources group.
a. USB cable between the OSBDM
b. Ethernet cable between the TWR-SER
c. Serial Port on the TWR-SER module
debugger (J14 on the TWR-MCF51CN
module) and a USB port on PC
module and an Ethernet port on an
external network
to a Serial Port on PC (optional,
cable not included)
8. The network settings need to be configured.
9. If the network you connected to uses DHCP,
Figure 3: Network Parameters
Figure 4: IPconfig on Simple Network
10. The GMT time can be configured on the
Look for the line in security.h that begins
with #define DEMOCFG_ENABLE_DHCP 1
skip to Step 10. However if the network you
are connected to requires you use a static IP,
change
Then change the other parameters shown in
Figure 3 to match your network. This is only
required if using a static IP:
You can get those values by asking your
network administrator. Alternatively, if your
computer is already connected to the network
via an Ethernet cable, open a Command
Prompt on the PC (Start > All Programs >
Accessories > Command Prompt). Then type
ipconfig /all to get the information for your
Local Area Connection to the Internet, as
shown in Figure 4. Then unplug the Ethernet
cable from your computer and plug it into the
Ethernet port on the Tower System.
MCF51CN128 by using the SNTP protocol.
The SNTP server to contact is specified by
a domain name which must be encased in
quotation marks, as shown in Figure 5.
The default SNTP address is the NIST time
server. However if your external internet
connection goes through a proxy or firewall,
you must use a SNTP server located
within your network. Contact your network
administrator to find out the address for
your network’s SNTP server. If you cannot
determine the SNTP server for your network,
then disable the SNTP feature by setting
DEMOCFG_ENABLE_SNTP to 0:
#define DEMOCFG_ENABLE_SNTP
#define DEMOCFG_ENABLE_DHCP 1 to
#define DEMOCFG_ENABLE_DHCP 0
Figure 5: SNTP Parameters
11. Next, set up the e-mail configuration. If you are
Note: e-Mail servers that requires encrypted
authentication, usually via SSL (for example, Gmail,
Hotmail, etc) will not work with this release of MQX
Figure 6: e-Mail Parameters
12. The main e-mail settings are configured in
13. If your SMTP server does not require
Figure 7: e-Mail Authentication
14. Now open up a serial connection using
using Outlook Express or Thunderbird, you can
find these settings in the configuration options.
You might also find these settings on the help
page for your network provider.
the #defines listed in Figure 6. Ensure that
all values are encased in quotation marks.
a. EMAIL_SERVER: The domain name of the
b. EMAIL_TO: e-Mail address to send the
c. EMAIL_FROM: Your official e-mail address
authentication, then skip to step 16.
However if it does require authentication,
and does not require encryption, change
Then change the username and password
parameters shown in Figure 7. The username
and password is usually the same combination
that you would use to access your e-mail.
Hyperterminal of Lab 1. This is optional,
as it will print out debug information that
might be useful if there is an issue with
your network connection.
SMTP server that you use for e-mail. It
cannot be a SMTP server that uses SSL
for authentication (for example Gmail
or Hotmail). If your network is behind a
firewall or proxy, you must use a SMTP
server located within your network.
e-mail to. This can be any e-mail address.
for the SMTP server you are connecting
to. You cannot use an alias or “friendly
address” e-mail address. Many servers
will reject connections that do not provide
a real e-mail address on the assumption
that it is spam.
#define DEMOCFG_AUTH_REQUIRED 0 to
#define DEMOCFG_AUTH_REQUIRED 1
(sheet 2 of 2)
15. Start HyperTerminal on the PC
Figure 8: Connect to COM1
16. Set it for 115200 baud, no parity, 8 bits
Figure 9: COM1 Properties
17. Compile, download, and run the application
18. Now, press a button on the Tower System.
Figure 10: e-Mail
(Start menu>Programs>Accessories>
Communications). Make a connection to the
serial port that is connected to the board
(usually will be COM1)
and click OK.
as was done in steps 12 to 15 of Lab 1.
After you release it, an e-mail will be sent
to the e-mail address you specified, stating
the time you pressed it and how much time
elapsed from the last event.
19. You can also send text messages via e-mail.
Figure 11: e-Mail-to-Text
Telnet to Serial Bridge,
Freescale MQX RTOS
for MCF51CN128
Introduction
This lab demonstrates how to create
a bridge between a TCP/IP (telnet)
connection and a serial line.
Figure: Software Flow Chart
Demonstrates
• MQX RTCS TCP/IP network stack
• Custom telnet server implementation
• Re-directing STDIN and STDOUT
Step by Step Instructions
1. Install CodeWarrior for Microcontrollers 6.2
Run telnet server with
Start telnet server
serial functionality
setup networking
Start RTCS and
For example, in the EMAIL_TO field, use
5125551234@tmomail.net to send a text
message to a T-Mobile user with the phone
number 512-555-1234. The domain name
is specific to the cell phone service provider
for that phone number. Contact your service
provider for more information, or search online.
LAB
“Bridge” task
within a MQX task
(30 day evaluation version available, Basic or
higher needed to run MQX Lab tutorials) then
install CodeWarrior 6.2.2 patch. Then open
CodeWarrior.
4
Autostart
Continued on reverse side...
TOWER SYSTEM
Related parts for TWR-MCF51CN-KIT
Image
Part Number
Description
Manufacturer
Datasheet
Request
R

Part Number:
Description:
LCD MODULE FOR TWR SYSTEM
Manufacturer:
Freescale Semiconductor
Datasheet:

Part Number:
Description:
TOWER ELEVATOR BOARDS HARDWARE
Manufacturer:
Freescale Semiconductor
Datasheet:

Part Number:
Description:
TOWER SERIAL I/O HARDWARE
Manufacturer:
Freescale Semiconductor
Datasheet:

Part Number:
Description:
MEMORY MODULE FOR TWR SYSTEM
Manufacturer:
Freescale Semiconductor
Datasheet:

Part Number:
Description:
MCU, MPU & DSP Development Tools TOWER CD MCF51AG128 KIT
Manufacturer:
Freescale Semiconductor

Part Number:
Description:
TOWER SYSTEM SENSOR PAK
Manufacturer:
Freescale Semiconductor
Datasheet:

Part Number:
Description:
KIT TOWER BOARD
Manufacturer:
Freescale Semiconductor
Datasheet:

Part Number:
Description:
TOWER SYSTEM BOARD MC9S08MM128
Manufacturer:
Freescale Semiconductor
Datasheet:

Part Number:
Description:
TOWER SYSTEM BOARD MCF51MM
Manufacturer:
Freescale Semiconductor
Datasheet:

Part Number:
Description:
MCU, MPU & DSP Development Tools For 9S08MM128 USB CAN
Manufacturer:
Freescale Semiconductor
Datasheet:
Part Number:
Description:
LCD MODULE FOR TWR SYSTEM
Manufacturer:
Freescale Semiconductor
Datasheet:

Part Number:
Description:
K53N512CMD100 TWR Module
Manufacturer:
Freescale Semiconductor
Datasheet:
Part Number:
Description:
TWR-K53N512 Dev Kit
Manufacturer:
Freescale Semiconductor
Datasheet:
Part Number:
Description:
TOWER ELEVATOR BOARDS HARDWARE
Manufacturer:
Freescale Semiconductor
Datasheet:
Part Number:
Description:
TOWER SERIAL I/O HARDWARE
Manufacturer:
Freescale Semiconductor
Datasheet: