CME-12B32 AXIOM, CME-12B32 Datasheet - Page 4
CME-12B32
Manufacturer Part Number
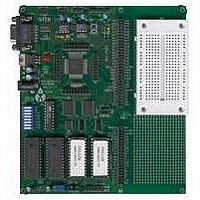
CME-12B32
Description
Microprocessor Development Tool
Manufacturer
AXIOM
Datasheet
1.CME-12B32.pdf
(15 pages)
Specifications of CME-12B32
Silicon Manufacturer
Freescale
Kit Contents
Board
Silicon Core Number
68HC12B32
Memory Organization - Flash
32 KB
Development Tool Type
Hardware - Eval/Demo Board
Clock Frequency
16MHz
Lead Free Status / RoHS Status
Contains lead / RoHS non-compliant


TUTORIAL
This tutorial will walk you thru the complete development cycle of a very simple program. This should help you get started
with the specifics of the CME12B32 development process. Be sure to read the rest of this manual as well as the
documentation on the disk if you need further information.
You can develop software using either your PCs serial port and the DBUG12 monitor utility or your PCs Parallel port and a
Background Debug Module (BDM) connected to the DEBUG connector.
Using DBUG12
Example Program
For this tutorial we’ll use an assembly language program on the UTL12 software disk called HELLO3.ASM. This is a
simple program that just sends a text string to your PC serial port using the HC12 SCI0 (COM1) port. You can substitute
your own program here if you wish but, to verify everything is working properly, it’s a good idea to start with something
simple.
1. If you haven’t done so already, verify that the board is connected and operating properly by following the steps under
2. At your PC’s DOS command line prompt, change to your UTL12 software directory.
3. Execute the command:
4. Select "Assembler" from the main menu and input the file called HELLO3.ASM which is located in the program
5. If any errors were found, the program listing would be displayed on the screen which contains the errors. Otherwise,
6. Select “Terminal Window” from the menu.
7. Press and release the RESET button on the board. You should see the monitor prompt.
8. Press any key to start the debugger.
9. Type LOAD
10. Press the Page Up key and when prompted for a file name, select the file just created called HELLO3.S19
11. Type CALL 900
12. If everything is working properly you should see the message “Hello World” echoed back to your terminal screen then,
13. If you didn’t get this message, try going thru this tutorial once more then, if still no go, see the TROUBLESHOOTING
You can modify the hello program to display other strings or do anything you want. The procedures for assembling your
code, uploading it to the board and executing it remain the same. The monitor has many powerful features such as
breakpoints, memory dump and modify and program trace. Type HELP at the monitor prompt for a listing of commands
available.
“GETTING STARTED”.
This will launch the Axiom programming interface for the HC12 development boards.
directory. This will assemble our test source code.
you should have the new file HELLO3.S19 (a Motorola hex object file) in your directory.
This will prepare the monitor to receive a program.
then select [ OK ]. Your program will be sent to internal RAM.
This tells the monitor to execute the subroutine at address $900, which is the start of our test program.
since we return at then end of our program, lines containing the internal register status and the monitor prompt.
section in this manual
AX12
4
Related parts for CME-12B32
Image
Part Number
Description
Manufacturer
Datasheet
Request
R


Part Number:
Description:
Microprocessor Development Tool
Manufacturer:
AXIOM
Datasheet:

Part Number:
Description:
CMD-5XX MOTHERBOARD ONLY
Manufacturer:
AXIOM
Datasheet:
