CMD-711EX AXIOM, CMD-711EX Datasheet - Page 3
CMD-711EX
Manufacturer Part Number
CMD-711EX
Description
Microprocessor Development Tool
Manufacturer
AXIOM
Datasheet
1.CMD-711EX.pdf
(15 pages)
Specifications of CMD-711EX
Silicon Manufacturer
Freescale
Kit Contents
Board
Silicon Family Name
68HC11E
Silicon Core Number
MC68HC11E9FN, MC68HC11E20FN
Development Tool Type
Hardware - Eval/Demo Board
Lead Free Status / RoHS Status
Contains lead / RoHS non-compliant


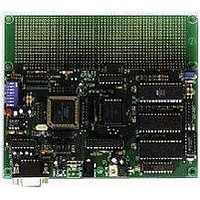
The Axiom CMD711-EX single board computer is a fully assembled, fully functional development system for the
Motorola 68HC11E Microcontroller series, complete with wall plug style power supply and serial cable. To get started
quickly, perform the following test now to make sure everything is working correctly:
1. Install the software on your PC by running the SETUP.EXE program on the disk.
2. Connect one end of the supplied serial cable to a free COM port on your PC. Connect the other end of the cable
3. Apply power to the board by plugging in the wall plug power supply that came with the system.
4. Run the programming utility installed from the disk. You can use either the Windows version (AXIDE) or DOS
5. If you're using the DOS program:
6. If you're using the Windows program:
7. Press then release the RESET button on the CMD711-EX board now.
8. If everything is working properly, you should see the buffalo monitor prompt in the terminal window. Your board
If you do not see the monitor/debugger message prompt, or the text is garbage, see the TROUBLESHOOTING
section of this manual.
NOTE that buffalo monitor is loaded at the factory and the jumpers set to run the program when the board is shipped.
If you did not receive the board from Axiom, or if it has been used previously, the Buffalo Monitor program may have
been overwritten. You can re-program it easily from the file named BUF34E.S19. located on the disk.
DEVELOPMENT PHILOSOPHY
The CMD711-EX board is memory mapped to emulate the Motorola 68HC11E9 (12K) and 68HC11E20 (20K)
memory maps for program storage. Custom memory configurations can be produced at the factory.
Software development on the Axiom CMD711-EX development board can be performed using the Buffalo Debug
Monitor utility, located in the re-programmable external EEPROM in U5, to create or assist in creating your program
stored in RAM. During this "debug" mode your program should locate itself above the internal register block, for
example $2000 (see the Memory Map section for details).
After satisfactory operation running under the monitor environment, your program can easily be written to the external
EEPROM Program Memory in U5 by relocating it to start at the beginning of EEPROM memory (which is usually
$D000) then selecting Program from the menu. When programming is complete, you simply turn off the mode
switches so your program will run automatically when the board is powered on or RESET is applied.
Using the external EEPROM this way is very convenient since you can re-write the same memory chips over and
over many times without any special UV erasing, which would require chip removal.
To return to "debug" mode under the Monitor you must re-program the monitor utility in EEPROM. The file name is
BUF34E.S19.
Programming this file will re-install the Buffalo Monitor starting at $E000 and will program the reset vector address
($FFFE - $FFFF) to point to $E000. A common mistake is to forget to program this reset vector in your own code
when running it from EEPROM.
If you want to distribute your software in a board you have designed, you can program it into Internal (onchip)
EPROM, or OTP, in U1 by selecting Internal Program Memory from the menu instead of External Program Memory.
The micro in U1 can then be removed and replaced with a blank one.
to the DB-9 Serial COM1 port on the CMD711-EX board.
version (AX11E) of the utilities. Do not run both at the same time.
is now ready to use!
Change to the directory containing the utility software and execute the program: AX11E.EXE.
Select the PC COM port that you’re using.
From the main menu select “Terminal Window”.
Double click the AXIDE icon to start the program.
Select the PC COM port that you’re using from the Options window.
3
Related parts for CMD-711EX
Image
Part Number
Description
Manufacturer
Datasheet
Request
R

Part Number:
Description:
Single Board Computer
Manufacturer:
AXIOM
Datasheet:


Part Number:
Description:
General Power Transformer <SMD Type: CMD Series>
Manufacturer:
Sumida Corporation
Part Number:
Description:
Power Inductors <SMD Type: CMD Series>
Manufacturer:
Sumida Corporation
Part Number:
Description:
General Power Transformer <SMD Type: CMD Series>
Manufacturer:
Sumida Corporation

Part Number:
Description:
Linear Regulators - Standard VDDQ/VTT Regulator P2 Fused
Manufacturer:
CMD / ON Semiconductor
Part Number:
Description:
Switching Converters, Regulators & Controllers Charge Pump LDO
Manufacturer:
CMD / ON Semiconductor