MPAXR000 Red Lion Controls, MPAXR000 Datasheet - Page 7
MPAXR000
Manufacturer Part Number
MPAXR000
Description
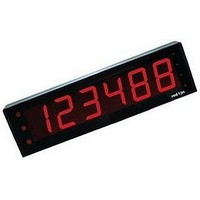
Rate Input Module
Manufacturer
Red Lion Controls
Datasheet
1.EPAX0600.pdf
(8 pages)
Specifications of MPAXR000
Accessory Type
Digital Input Module
Signal Input Type
Count And Rate, Serial Slave
No. Of Digital Inputs
6
For Use With
EPAX 6 Digit Displays
Lead Free Status / RoHS Status
Lead free / RoHS Compliant


ASSEMBLY AND INSTALLATION PROCEDURE
1. Install the two mounting channels on the enclosure housing using
2. If the wiring is to be routed through the housing, make sure that
3. Before installing the Display into the housing, be sure that the
4. If using the shroud, refer to the Shroud Installation Procedure.
5. Mount the housing, using the strut nuts and steel ¼-20 UNC
6. Connect the wires to the Display per the instructions included
7. Remove the center section of the rear panel gasket. Apply the
DIMENSIONS FOR THE EPAX DISPLAY SHROUD
Displays that are installed in areas with high intensity overhead light
sources. The Shroud can be used with the EPAX Display in any
installation, (panel mount, NEMA 4/IP65 Enclosure, or Universal
Mounting Bracket). When properly assembled, the Shroud will not
affect the integrity of a NEMA 4/IP65 installation. The Shroud weighs
1.0 pounds (0.45 Kg).
SHROUD INSTALLATION PROCEDURE
Installing The Shroud On An EPAX Display In A NEMA 4/IP65 Enclosure Or Panel
1. Place a gasket over the studs extending from the rear of the front
2. Orient the shroud as shown in Figure 6, and place it over the
3. Place the other gasket over the studs.
4. Install the unit into the panel or enclosure using the #10-32 keps
the four #8-32 screws provided and then insert the strut nuts
(provided). Invert enclosure if base mounting.
the mounting channels are oriented properly before drilling, so
the Display will be readable. Wiring is generally brought into the
right side of the housing or rear panel, closest to the terminals of
the MPAX module. Drill the proper size hole in the housing or
rear panel for the wiring connector or sealed conduit fitting and
attach the fitting(s)
mounting channels are oriented properly for the type of
installation planned. Place the gasket that is supplied with the
Display over the studs extending from the front panel of the
display.
Place the Display with gasket through the holes in the housing as
shown at right. Working back and forth across the stud pattern,
install the #10-32 keps nuts supplied with the Display on the
studs. Tighten firmly.
bolts and washers, as shown in figure 4.
with the personality board.
gasket to the rear panel of the enclosure by inserting the #8-32
screws through the panel and into the holes in the gasket.
Position the panel on the housing, start all of the screws, then
firmly tighten them in a pattern working back and forth across
the rear panel.
The optional EPAX Display Shroud enhances the readability of the
panel of the Display.
display. The studs of the display should now be protruding
through the rear of the shroud.
nuts that are supplied with the Display. Tighten the nuts firmly.
Nema 4/IP65 Shroud Installation
*
Supplied with EPAX.
*
Supplied with EPAX.
DIMENSIONS In inches (mm)
7
Figure 5
Figure 6
Figure 4
Related parts for MPAXR000
Image
Part Number
Description
Manufacturer
Datasheet
Request
R

Part Number:
Description:
Counter
Manufacturer:
Red Lion Controls
Datasheet:
Part Number:
Description:
Miniature Length Sensor
Manufacturer:
Red Lion Controls
Datasheet:
Part Number:
Description:
Model Lsc - Single Channel Output Length Sensor
Manufacturer:
Red Lion Controls
Datasheet: