SX1211-11SKA868 Semtech, SX1211-11SKA868 Datasheet - Page 14
SX1211-11SKA868
Manufacturer Part Number
SX1211-11SKA868
Description
KIT STARTER FOR SX1211 868MHZ
Manufacturer
Semtech
Type
Transceiverr
Specifications of SX1211-11SKA868
Frequency
868MHz
For Use With/related Products
SX1211 (868MHz)
Lead Free Status / RoHS Status
Lead free / RoHS Compliant
Other names
SX1211-11SK868
SX1211-11SK868
SX1211-SKA868
SX1211-SKA868
SX1211SK868
SX1211SK868
SX1211-11SK868
SX1211-SKA868
SX1211-SKA868
SX1211SK868
SX1211SK868
Available stocks
Company
Part Number
Manufacturer
Quantity
Price
Company:

Part Number:
SX1211-11SKA868
Manufacturer:
Semtech
Quantity:
135


In addition the RESET of the board will not affect the parameters of the default Ping Pong demo.
4.4.2
While the Ping-Pong Test is in progress:
4.4.3
To enable the default Ping Pong test the user needs to click on the “Default Ping-Pong” button on the
PC-GUI interface before disconnecting the RS232 cable from the board.
4.4.4
To read the Default Ping Pong configuration saved in the Microcontoller memory, the user needs to
click on “SX1211 Eval” to have access to the control buttons. Click on “Get Config”, do not click on
“Load Config”. The Graphic Interface will display the Default Ping Pong configuration which has
been saved into the microcontroller.
4.5
4.5.1
The “User Ping Pong Test” allows the user to achieve a Ping Pong Test with their own settings. The
User configuration will be saved in an EEPROM, but will be lost after the RESET function. This mode
allows the user to modify all the parameters of the SX1211 (Frequency deviation, Local Oscillator f1,
f2, f3, Pattern, etc). The only restriction is the data rate, which must be lower than 38.4kbps for a
Ping-Pong Test.
4.5.2
To modify the Ping-Pong settings, the user needs to click on the “SX1211 Eval” button before starting
the parameter modifications. The next step is to send the new configuration to the microcontroller by
clicking on “Send Config”. To save this configuration into the memory (EEPROM), the user needs to
click on the “Save Config” button. The RESET operation will erase all the user parameters. To start
the User Ping Pong test the user needs to click on the “User Ping-Pong” button on the PC-GUI
interface before disconnecting the RS232 cable from the board.
Rev1.1
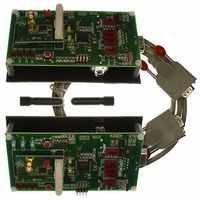
Two SX1211 radio modules
Two antennas
Two processor boards
USER PING-PONG TEST
Equipment required
Default Ping-Pong Test enabling
Read back the configuration
Purpose
User Ping-Pong Test Enabling
-
-
Tx Yellow Led switched ON indicates a radio message is being sent
Rx Yellow Led switched ON indicates a valid radio message is being received
Figure 4.2 Ping-Pong test Hardware set up
14 of 30
SX1211SK868/915 User Guide
www.semtech.com
Related parts for SX1211-11SKA868
Image
Part Number
Description
Manufacturer
Datasheet
Request
R

Part Number:
Description:
KIT USB FOR SX1211 TXRX 915MHZ
Manufacturer:
Semtech
Datasheet:
Part Number:
Description:
EVALUATION BOARD
Manufacturer:
Semtech
Datasheet:
Part Number:
Description:
EVALUATION BOARD
Manufacturer:
Semtech
Datasheet:
Part Number:
Description:
VOLTAGE SUPPRESSOR, TRANSIENT SEMTECH
Manufacturer:
Semtech
Datasheet:

Part Number:
Description:
HIGH VOLTAGE CAPACITORS MONOLITHIC CERAMIC TYPE
Manufacturer:
Semtech Corporation
Datasheet:
Part Number:
Description:
EZ1084CM5.0 AMP POSITIVE VOLTAGE REGULATOR
Manufacturer:
Semtech Corporation
Datasheet:
Part Number:
Description:
3.0 AMP LOW DROPOUT POSITIVE VOLTAGE REGULATORS
Manufacturer:
Semtech Corporation
Datasheet:
Part Number:
Description:
Manufacturer:
Semtech Corporation
Datasheet:
Part Number:
Description:
RailClamp Low Capacitance TVS Diode Array
Manufacturer:
Semtech Corporation
Datasheet:
Part Number:
Description:
Manufacturer:
Semtech Corporation
Datasheet:
Part Number:
Description:
Manufacturer:
Semtech Corporation
Datasheet:
Part Number:
Description:
Manufacturer:
Semtech Corporation
Datasheet: