2-231652-0 Tyco Electronics, 2-231652-0 Datasheet

TOOL CRIMP MODULAR W/O DIES

2-231652-0

Manufacturer Part Number
2-231652-0
Description
TOOL CRIMP MODULAR W/O DIES
Manufacturer
Tyco Electronics
Type
Crimp Tool Assemblyr
Datasheets

Specifications of 2-231652-0

Tool Type
Handle, Frame - without Die Set
Features
Top Entry, Ratchet
Crimp Tool
Hand Held Crimp Tool
Product
Crimping, Stripping & Cutting Tools & Drills
Description/function
Hand crimp tool assembly, modular plug
For Use With
A9926 - DIE SET 8POS MOD PLUG CAT 5A9927 - DIE SET 6POS MOD PLUG OFFSETA9030 - DIE SET 6 POS (LONG BODY) PLUGSA9905 - DIE, 6 POS MOD PLUG IS9611A9906 - DIE FOR 4 POSITION TOOL (GREEN)A9904 - DIE FOR 8 POSITION TOOL (BLK)
Lead Free Status / RoHS Status
Not applicable / Not applicable
For Use With/related Products
Modular Connectors
Lead Free Status / Rohs Status
Lead free / RoHS Compliant
Other names
A9931
1. INTRODUCTION
Modular Plug Hand Tools 231652-[ ] (shown in
Figure 1) are designed to terminate modular plug
connectors onto stranded or solid, shielded or
unshielded flat oval cable or round cable. The tool also
cuts and strips unshielded flat oval cable. Other cable
must be prepared by separate tools.
Each tool includes Die Set 853400-[ ] (see Figure 2),
except Tool 2-231652-0 which is available without a
die set. The die sets are also available separately.
Reasons for reissue of this instruction sheet are
provided in Section 8, REVISION SUMMARY.
©2011 Tyco Electronics Corporation, a TE Connectivity Ltd. Company
All Rights Reserved
*Trademark
TE Connectivity, TE connectivity (logo), and TE (logo) are trademarks. Other logos, product and/or Company names may be trademarks of their respective owners.
PROPER USE GUIDELINES
Cumulative Trauma Disorders can result from the prolonged use of manually powered hand tools. Hand tools are intended for occasional use
and low volume applications. A wide selection of powered application equipment for extended-use, production operations is available.
Cable Cutter
Indenter (Die)
Color Code Dot
Flat Oval
Cable Stripper
NOTE
i
All numerical values in this instruction sheet are in
metric units [with U.S. customary units in brackets].
Dimensions are in millimeters [and inches]. Figures
are not drawn to scale.
CAUTION
!
Die Holding
Screw
Figure 1
Ratchet
Release
(Pawl)
Handle
CAUTION: DO NOT cycle the
tool without a die in place;
otherwise damage to the
stripping blades may occur.
Modular Plug Hand Tools
(Premium Grade) 231652-[ ]
TOOLING ASSISTANCE CENTER 1-800-722-1111
PRODUCT INFORMATION 1-800-522-6752
Ratchet
Nest (Die)
Color Code
Dot
2. DESCRIPTION
The die set consists of a nest and an indenter, each
marked with a color-code dot. The die set is held in the
tool by a single die-holding screw. Each die set is
unique to its purpose, but die sets can be
interchanged to accommodate any modular plug.
Refer to Figure 2.
The tool features a wire cutter and flat oval cable
stripper to prepare unshielded flat oval cable. The tool
handle ensures full crimping. Once engaged, the
ratchet will not release until the handles have been
FULLY closed, unless the ratchet release (pawl) is
depressed to manually release the ratchet. When
depressed, the pawl prevents crimping of an
improperly positioned modular plug.
This controlled document is subject to change.
For latest revision and Regional Customer Service,
visit our website at www.te.com
(FIgure1)
Figure 2
Instruction Sheet
408-9767
08 APR 11 Rev M
1 of 7
LOC B

2-231652-0 Summary of contents

Page 1

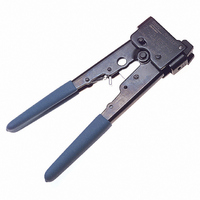
... Other cable must be prepared by separate tools. Each tool includes Die Set 853400-[ ] (see Figure 2), except Tool 2-231652-0 which is available without a die set. The die sets are also available separately. All numerical values in this instruction sheet are in NOTE metric units [with U ...

Page 2

... Insert cable squarely into CUT slot in tool cable cutter. Squeeze handles until ratchet releases. 2. Insert trimmed cable into STRIP slot in tool flat oval cable stripper until cable butts against die cable stop. 3. Close handles to last ratchet stop, but DO NOT release them ...

Page 3

Figure 4 Rev M 408-9767 Figure ...

Page 4

... End of Wire Circuits i 1. Close tool handles until the dies bottom, but DO NOT release the handles. 2. Loosen the two screws that hold the movable blade assembly. 3. Insert Blade Set-Up Gage 231667-2 (available separately and part of Blade Replacement Kit 231662- 1.02-mm [.040-in.] shim between the stationary and movable blades ...

Page 5

... Remove the four screws holding both blades in place. Remove fixed blade assembly and movable blade assembly from tool. Rev M 2. Position new blades onto tool with beveled edges facing inward. 3. Install and tighten screws. Adjust flat oval cable stripper according to Paragraph 5.2. ...

Page 6

... Refer to Figure 10 for a description of each. A complete inventory should be stocked and controlled to prevent lost time when replacement of parts is necessary. Order replacement parts through your representative, or call 1-800-526- 5142, or send a facsimile of your purchase order to 717-986-7605 or write to: CUSTOMER SERVICE (038-035) TYCO ELECTRONICS CORPORATION PO BOX 3608 ...

Page 7

... Refer to Figure 2 for cross-refeerence of tools to die set part numbers. KIT PART NUMBER BLADE REPLACEMENT KIT -- Blade Set-Up Gage, 4 Pan Head Screws, 1 Cutter Blade Screw, 5 Wire Cutter Blades, 5 Fixed 231662-4 ...