ATAVRONEKIT Atmel, ATAVRONEKIT Datasheet - Page 5
ATAVRONEKIT
Manufacturer Part Number
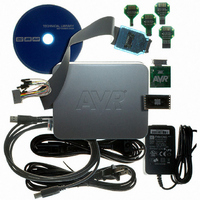
ATAVRONEKIT
Description
KIT AVR/AVR32 DEBUGGER/PROGRMMR
Manufacturer
Atmel
Series
AVR®r
Type
Debuggerr
Specifications of ATAVRONEKIT
Contents
Programmer/Debugger
Processor To Be Evaluated
AVR32
Data Bus Width
32 bit
Interface Type
ISP, JTAG
Core Architecture
AVR
Kit Contents
ATAVRONEKIT
Tool / Board Applications
General Purpose MCU, MPU, DSP, DSC
Development Tool Type
Hardware / Software - Dev Kit (Dev Tool)
Rohs Compliant
Yes
Mcu Supported Families
AVR32 32-bit MCU
For Use With/related Products
AVR® Devices
Lead Free Status / RoHS Status
Lead free / RoHS Compliant
Available stocks
Company
Part Number
Manufacturer
Quantity
Price
Company:

Part Number:
ATAVRONEKIT
Manufacturer:
Atmel
Quantity:
135


2.1
2.2
2.3
AVR ONE! Quick-start Guide
Install Hardware and software
Create a demonstration project
Configure target MCU for a debug session using trace
Download and install avr32-gnu-toolchain-2.4.x and AVR32Studio-2.5.x.
Connect AVR ONE! to power and USB and turn it on.
Install AVR ONE! USB driver.
Connect AVR ONE! to the EVK1101 using the 10pin JTAG connector.
Connect the EVK1101 to power and turn it on.
Start AVR32 Studio.
Select a suitable workspace folder to contain your projects.
Exit from the welcome screen to workbench.
Right-click in the AVR32 Targets view and select Scan Targets.
Select the AVR ONE! and click on the Properties-tab.
Select Board-tab. Set Board to EVK1101, MCU to UC3B0256 or UC3B256ES, depending on what
MCU is mounted on your EVK1101.
Right-click on the AVR ONE! in the AVR32 Target view and select Chip Erase. This operation is only
needed one time (when the EVK1101 is new).
Select File>New>Example.
Select EVK1101>Components>Accelerometer example, then Next.
Enter a name for the project, and click Finish.
Right-click on the project in Project Explorer view and select Build Project (or use Ctrl+B).
When the build process is finished, right-click on the project in the Project Explorer-view and select
Debug As>Debug Configurations.
In the Debug-view, select AVR32 Application and click New. A new launch configuration will be
created and default values will be filled into all fields.
Select the Trace-tab and click Enable Trace.
Select the preferred trace method. In this case we want Nano Trace.
Select the preferred action when buffer is full. In this case we choose Break, read out and halt.
Deselect the option Break on application buffer access
Set Buffer Size. Select Specify size and location, then click Detect.
Quick-start guide (short version)
32104B–AVR ONE!–02/10
Section 2
2-1
Related parts for ATAVRONEKIT
Image
Part Number
Description
Manufacturer
Datasheet
Request
R

Part Number:
Description:
DEV KIT FOR AVR/AVR32
Manufacturer:
Atmel
Datasheet:

Part Number:
Description:
INTERVAL AND WIPE/WASH WIPER CONTROL IC WITH DELAY
Manufacturer:
ATMEL Corporation
Datasheet:
Part Number:
Description:
Low-Voltage Voice-Switched IC for Hands-Free Operation
Manufacturer:
ATMEL Corporation
Datasheet:
Part Number:
Description:
MONOLITHIC INTEGRATED FEATUREPHONE CIRCUIT
Manufacturer:
ATMEL Corporation
Datasheet:
Part Number:
Description:
AM-FM Receiver IC U4255BM-M
Manufacturer:
ATMEL Corporation
Datasheet:
Part Number:
Description:
Monolithic Integrated Feature Phone Circuit
Manufacturer:
ATMEL Corporation
Datasheet:
Part Number:
Description:
Multistandard Video-IF and Quasi Parallel Sound Processing
Manufacturer:
ATMEL Corporation
Datasheet:
Part Number:
Description:
High-performance EE PLD
Manufacturer:
ATMEL Corporation
Datasheet:
Part Number:
Description:
8-bit Flash Microcontroller
Manufacturer:
ATMEL Corporation
Datasheet:
Part Number:
Description:
2-Wire Serial EEPROM
Manufacturer:
ATMEL Corporation
Datasheet: