R0K438347S000BE Renesas Electronics America, R0K438347S000BE Datasheet
R0K438347S000BE
Specifications of R0K438347S000BE


Related parts for R0K438347S000BE


R0K438347S000BE Summary of contents
Page 1
To our customers, Old Company Name in Catalogs and Other Documents st On April 1 , 2010, NEC Electronics Corporation merged with Renesas Technology Corporation, and Renesas Electronics Corporation took over all the business of both companies. Therefore, although the ...
Page 2
All information included in this document is current as of the date this document is issued. Such information, however, is subject to change without any prior notice. Before purchasing or using any Renesas Electronics products listed herein, please confirm ...
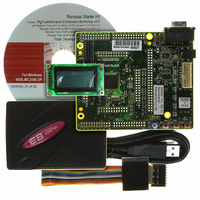
Page 3
Quick Start 1. Installation Do not connect the E8a module until the software support has been installed. 1. Insert the CD into your computer’s CD-ROM drive. The CD should automatically run the installation program. If the installer does not start, ...
Page 4
Connection 11. Fit the LCD module to J10 on the RSK lies above J3. Ensure all the pins of the connector are correctly inserted in the socket. 12. Now connect the E8a to J6/E8 on the RSK ...
Page 5
Programming and Debug 27. Ensure the “SessionH8_SLP_E8a_SYSTEM_300L” session in the right hand drop down list on the toolbar is selected. 28. Click the <Connect> button on the debug toolbar. 29. Select the correct device type (e.g. H8/38347F for RSKH838347). ...
Page 6
Next Step After you have completed this quick start procedure, please review the tutorial code and sample code that came with the kit. You can add projects to the current workspace by selecting (Project > Insert Project) from the ...