A7D-2M-1 Omron, A7D-2M-1 Datasheet - Page 4
A7D-2M-1
Manufacturer Part Number
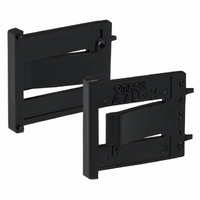
A7D-2M-1
Description
Endcap, Ship 1 LFT And 1 RGT
Manufacturer
Omron
Datasheet
1.A7D-2M-1.pdf
(5 pages)
Specifications of A7D-2M-1
Accessory Type
End Cap
Number Of Sections
1
Contact Rating
100 mAmps
Termination Style
PCB
Output Code
Binary
Lead Free Status / RoHS Status
Lead free / RoHS Compliant
For Use With/related Products
SW279 ~ SW280, SW504 ~ SW505
For Use With
SW280 - SWITCH THUMBWHEEL BLK FRONT MT
Lead Free Status / Rohs Status
Lead free / RoHS Compliant
Other names
A7D2M1
SW282
SW282


Ordering Procedure
Place orders as shown in the example below, specifying the model and number.
1. A7D-2M (End Caps): 1 pair
2. A7D-206-S@@ (Switch Unit with stopper): 1 piece
3. A7D-206 (Switch Unit): 1 piece
4. A7D-2P@ (Spacer): 1 piece
5. A7D-206 (Switch Unit): 2 pieces
Note: Standard products, such as the Switch Units and End Caps, are not factory-assembled for shipment. Contact your OMRON representative for details on ordering
Safety Precautions
Refer to Safety Precautions for All Thumbwheel Switches
Handling
• The molded components of the Switch use polyacetal resin and
• Do not use thinner or other solutions which might damage the resin.
• Terminals can withstand a force of 4.9 N for 10 seconds or more
• The setting buttons can withstand 19.6 N for 1 minute, but do not
PBT resin. It is recommended that alcohol is used to wipe off dirt
and smudges from the molded components. Take care to prevent
the alcohol from getting inside.
(the mating strength of the case and seal), and survive bending of
20° without breaking after returning to original position. Do not use
excessive force or apply repetitive external force, however, when
handling terminals. In particular, take care to avoid dropping them
as the terminals might bend or break.
push the (+) and (-) buttons at the same time.
factory-assembled sets.
1
Precautions for Correct Use
2
3
4
5
1
Soldering
Use a 30-W soldering iron at a temperature of 350°C for a maximum
of 3 seconds, and flush as described above.
Do not apply force to the terminals during soldering and for 3 minutes
after soldering is completed. Doing so may result in conduction or
operation failure.
Ensure that soldering flux and alcohol do not penetrate into the Switch
interior
Setting Numbers
Pen-push Type
Press the setting switch with the tip of a ball-point pen. Do not use
pencil point or mechanical pencil point to press the setting switch,
otherwise the lead of the pencil or mechanical pencil may be broken
and A7DP malfunctions may result due to fragments of the broken
lead.
Screw-mounting Models
Tighten mounting screws to a torque between 0.2 to 0.24 N·m, using
M2.6 screws. Use plain washers or spring washers together with the
screws.
• Using a Soldering Iron
.
A7D/A7DP
4
Related parts for A7D-2M-1
Image
Part Number
Description
Manufacturer
Datasheet
Request
R

Part Number:
Description:
Endcap, Ship 1 LFT And 1 RGT
Manufacturer:
Omron
Datasheet:

Part Number:
Description:
Endcap, Ship 1 LFT And 1 RGT
Manufacturer:
Omron
Datasheet:

Part Number:
Description:
G6S-2GLow Signal Relay
Manufacturer:
Omron Corporation
Datasheet:
Part Number:
Description:
Compact, Low-cost, SSR Switching 5 to 20 A
Manufacturer:
Omron Corporation
Datasheet:
Part Number:
Description:
Manufacturer:
Omron Corporation
Datasheet:
Part Number:
Description:
Manufacturer:
Omron Corporation
Datasheet:
Part Number:
Description:
Manufacturer:
Omron Corporation
Datasheet:
Part Number:
Description:
Manufacturer:
Omron Corporation
Datasheet:
Part Number:
Description:
Manufacturer:
Omron Corporation
Datasheet:
Part Number:
Description:
Manufacturer:
Omron Corporation
Datasheet: