RP34L-5PA-2SC(1857)(71) Hirose Electric Co Ltd, RP34L-5PA-2SC(1857)(71) Datasheet - Page 6
RP34L-5PA-2SC(1857)(71)
Manufacturer Part Number
RP34L-5PA-2SC(1857)(71)
Description
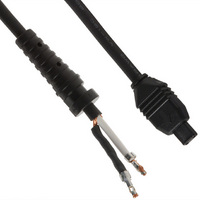
CONN PLUG STRAIGHT POWR SUPPLY
Manufacturer
Hirose Electric Co Ltd
Series
RP34Lr
Datasheet
1.RP34L-5PA-2SC185771.pdf
(7 pages)
Specifications of RP34L-5PA-2SC(1857)(71)
Length
6.09' (1.86m)
Color
Black, Individual (Round)
Connector Type
Plug to Cable
Number Of Positions
2
Number Of Rows
1
Shielding
Shielded
Cable Termination
Crimp
Product
Power Assemblies
Wire Size (awg)
18
Connector End A
Power Plug
Connector End B
Power Plug
Cable Type
Power Cable
Connector End A Pin Count
2
Connector End B Pin Count
2
Contact Plating
Palladium
Equipment Type
Cable Assembly
Gender
Female
Mounting Angle
Straight
Wire Gauge Min (awg)
18
Lead Free Status / RoHS Status
Lead free / RoHS Compliant
Features
-
Contact Finish
-
Contact Finish Thickness
-
Usage
-
Pitch - Connector
-
Pitch - Cable
-
Lead Free Status / Rohs Status
Lead free / RoHS Compliant
Other names
*RP34L-5PA-2SC(1857)(71)
HR1288
HR1288


The product information in this catalog is for reference only. Please request the Engineering Drawing for the most current and accurate design information.
All non-RoHS products have been discontinued, or will be discontinued soon. Please check the products status on the Hirose website RoHS search at www.hirose-connectors.com, or contact your Hirose sales representative.
6
Straight Plug
Right Angle Plug
Assembly Instructions(3-Position Plug)
Outer case
Insulator body
Outer case
Outer case
Outer case
Outer case
Insulator body
1. Slide the bushing over the cable.
2. Prepare the cable end and the conductors as shown.
3. Crimp the contacts to each conductor.
4. Insert each of the contacts into the insulator body.
5. Crimp the cable clamp over the cable at designated
6. Place the outer case on a flat surface , with inside facing up.
7. Carefully place the insulator body, clamp and the bushing
Note A: When placing all components in the case,
Note B: All components should fit easily, without use of
8. Carefully align the other outer case over all
9. Snap the case in place.
1. The right angle plug can also be assembled by
Verify that the contact is secure by slightly pulling
on the conductor. Should the contacts require re-
insertion, use the tool RP6-SC-TP to remove them
(Inserted from the termination side).
dimension (Tool number:RP34-TC-01).
into corresponding indents and cut-outs in the outer case.
components case. Do not force alignment.
using the same procedure as the straight plug.
Verify the crimp dimensions.
Verify correct location. (As shown on drawing)
exercise caution as NOT to damage any of the
protruding snap.
any force.
Related parts for RP34L-5PA-2SC(1857)(71)
Image
Part Number
Description
Manufacturer
Datasheet
Request
R

Part Number:
Description:
CONN PLUG STRAIGHT POWR SUPPLY
Manufacturer:
Hirose Electric Co Ltd
Datasheet:

Part Number:
Description:
CONN PLUG STRAIGHT POWER SUPPLY
Manufacturer:
Hirose Electric Co Ltd
Datasheet:
Part Number:
Description:
CONN PLUG STRAIGHT POWER SUPPLY
Manufacturer:
Hirose Electric Co Ltd
Datasheet:

Part Number:
Description:
DC Power Connectors 3P F STRT PLUG CRIMP LOW PROF CON AC PWR
Manufacturer:
Hirose Electric Co Ltd
Datasheet:
Part Number:
Description:
Conn Rectangular PL 14 POS 2.54mm Crimp RA Cable Mount
Manufacturer:
Hirose Electric Co Ltd
Part Number:
Description:
Conn Shrouded Header HDR 10 POS 2mm Solder ST SMD Embossed T/R
Manufacturer:
Hirose Electric Co Ltd
Datasheet:
Part Number:
Description:
DF11-20DP-2DSA(24)
Manufacturer:
Hirose Electric Co Ltd
Datasheet:
Part Number:
Description:
Conn Shrouded Header HDR 6 POS 2mm Solder ST Thru-Hole Bag
Manufacturer:
Hirose Electric Co Ltd
Datasheet:
Part Number:
Description:
Conn Shrouded Header HDR 8 POS 2mm Solder ST Thru-Hole Tube
Manufacturer:
Hirose Electric Co Ltd
Datasheet:
Part Number:
Description:
Conn Shrouded Header HDR 26 POS 2mm Solder ST SMD
Manufacturer:
Hirose Electric Co Ltd
Datasheet:
Part Number:
Description:
Conn Shrouded Header HDR 22 POS 2mm Solder ST SMD
Manufacturer:
Hirose Electric Co Ltd
Part Number:
Description:
Conn Shrouded Header HDR 22 POS 2mm Solder ST SMD
Manufacturer:
Hirose Electric Co Ltd
Part Number:
Description:
2mm 22w Wire to Board IDC Crimp Connector
Manufacturer:
Hirose Electric Co Ltd
Part Number:
Description:
Conn Board to Board HDR 40 POS 0.5mm Solder ST SMD Embossed T/R
Manufacturer:
Hirose Electric Co Ltd
Datasheet: