60640 Desco, 60640 Datasheet - Page 2
60640
Manufacturer Part Number
60640
Description
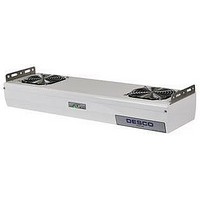
Chargebuster Overhead Ionizer
Manufacturer
Desco
Datasheet
1.60473.pdf
(4 pages)
Specifications of 60640
Ionizer Type
Overhead
Flow Rate Max
200CFM
Depth
6.5"
Width
24"
Height
3.5"
Supply Voltage Vac
120V
Mounting Type
Rigid Or Suspended
Body Material
Steel
Rohs Compliant
NA
Color
White


TB-3031 Page 2 of 4
Figure 3. 110 volt jumper setting
Figure 4. 220 volt jumper setting
Operation
Set the fan speed switch on the rear of the unit to the LOW,
MED, or HIGH position. Higher airflow will result in faster
discharge times. Position the unit so that the maximum
airflow is directed at the items or area to be neutralized.
Turn the unit ON.
When the unit is first turned on, it will conduct a self-test.
The audible alarm will sound and then the LED will cycle
through RED, YELLOW, and GREEN. The LED will remain
GREEN during normal operation.
BALANCE (OFFSET VOLTAGE) ADJUSTMENT
The Chargebuster Overhead Ionizer is an auto-balancing
unit. However, tuning or manual adjustment can be
accomplished by inserting a small screwdriver or trimmer
adjustment tool into the balance (offset voltage) adjustment
hole located on the front of the unit. To increase the output
in a positive direction, turn the potentiometer in a clockwise
direction. Conversely, to increase the output in a negative
direction, turn the potentiometer in a counter-clockwise
direction. Once the desired balance point has been
achieved, the alarm reset button must be pressed to set the
balance point.
MAINTENANCE / ALARMS
If the supply voltage drops from 120 Volts to below 85 Volts,
the unit will shut down, the audible alarm will beep, and the
LED will blink RED. The unit will automatically reset when
the minimum voltage is restored.
DESCO EAST - One Colgate Way, Canton, MA 02021-1407 • (781) 821-8370 • Fax (781) 575-0172 • Web Site:
DESCO WEST - 3651 Walnut Avenue, Chino, CA 91710 • (909) 627-8178 • Fax (909) 627-7449
Under normal conditions the ionizer will attract dirt and dust
(especially on the emitter electrodes). To maintain optimum
neutralization efficiency and operation, cleaning should be
performed on a regular basis.
When the unit enters shutdown mode, ionization will be
stopped, the LED on the front of the unit will change to a
steady RED, and the audible alarm will sound continuously.
If the ionizer enters shutdown mode, it must be turned OFF
and then back ON to reset the unit.
NOTE: The AC power cord MUST be disconnected
before the unit is disassembled for maintenance. The
emitter electrodes should be cleaned using the included
cleaners or a swab damp with isopropyl alcohol. First,
turn the unit OFF and unplug the power cord. Then
remove each fan grill located on the top-side of the ionizer
by disengaging all 4 screws per grill. Clean all emitter
electrodes. After cleaning the emitter electrodes, re-attach
all the removed grills. Plug in the power cord and turn the
unit back ON.
The emitter electrodes should not require replacement
during the life of the unit with normal handling.
Replacement emitter electrodes can be ordered if
necessary.
The best practice would be to verify the balance (offset
voltage) of the unit with a charged plate monitor after
cleaning.
NEUTRALIZATION (DISCHARGE) TIMES
The comparative efficiency of overhead ionizers is
determined by a standard test published by ANSI/ESD
S3.1. Typical positive and negative discharge times (in
seconds from 1000 volts to 100 volts and from -1000 volts
to -100 volts) measured using this standard are shown
below. The performance of the ionizer was measured with
the unit positioned as shown, with the fan speed on high,
and without a filter.
The typical discharge times measured using this standard
for the ionizer are shown in the following diagram. They are
not guaranteed maximum discharge times.
Figure 5. Neutralization (discharge) times - 2 fan ionizer
Desco.com
© 2010 DESCO INDUSTRIES INC.
Employee Owned