BH100D ETERNA, BH100D Datasheet - Page 2
BH100D
Manufacturer Part Number
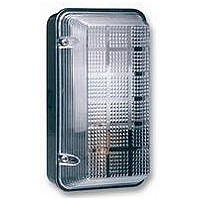
BH100D
Description
BULKHEAD, BLK
Manufacturer
ETERNA
Datasheet
1.BH100D.pdf
(2 pages)
Specifications of BH100D
Light Source
1 X BC GLS 100W
Colour
Black
Length
240mm
Depth
102mm
Svhc
No SVHC (15-Dec-2010)
Base Type
BC
External Depth
102mm
External Length / Height
240mm
External Width
133mm
Height
240mm
Ip/nema Rating
IP65
Width
133mm
Lamp Base Type
BC
Power Rating
100W


Safety markings:
Read this first:
>
>
>
>
>
>
>
>
>
>
>
>
>
>
This light fitting must be installed in accordance with the Building Regulations.
These may be obtained from HMSO or viewed and downloaded from www.odpm.gov.uk
following the link for Building Regulations.
If in any doubt, consult a qualified electrician.
Switch off the mains before commencing installation and remove the appropriate circuit
fuse.
Suitable for outdoor use.
To be mounted with the lamp in an upright position ( cap down ) or horizontally, not
suitable for mounting with the lamp inverted ( cap up ).
This product is suitable for installation on surfaces with normal flammability ( indicated by
the "F" in a triangle ) e.g. wood, plasterboard, masonry. It is not suitable for use on
highly flammable surfaces ( e.g. polystyrene, textiles ).
Before making fixing hole(s), check that there are no obstructions hidden beneath the
mounting surface such as pipes or cables.
The chosen location of your new fitting should allow for the product to be securely
mounted ( e.g. to a ceiling joist ) and safely connected to the mains supply ( lighting
circuit ).
If the location of your new fitting requires the provision of a new electrical supply, the
supply must conform with the requirements of the Building Regulations.
This product is designed for permanent connection to fixed wiring: this should be either a
suitable lighting circuit ( protected with a 5 or 6 Amp MCB or fuse ) or a fused spur ( with
a 3 Amp fuse ) via a fused connection unit. We recommend that the supply incorporates
a switch for ease of operation.
Make connections to the electrical supply in accordance with the following code:
Additional red wires may be present in your ceiling that are connected to the ring live
circuit. Do not connect your fitting to these wires. If these wires are not terminated in a
ceiling rose, join them together in a separate terminal block ( not supplied ), ensure that
there are no strands of wire protruding from the terminals and wrap well with insulating
tape.
This product must be connected to Earth.
You are advised at every stage of your installation to double-check any electrical
connections you have made. After you have completed your installation there are
electrical tests that should be carried out: these tests are specified in the Wiring
Regulations ( BS7671 ) referred to in the Building Regulations. If in doubt, consult a
qualified electrician.
Live - Brown or Red
Neutral - Blue or Black
Earth - Green and Yellow
IP65
Installation:
1)
2)
3)
4)
5)
6)
7)
8)
9)
10) Fit the grommet into your chosen entry point in the case.
11) Thread the supply cable into the fitting, if your cable enters from the top of the fitting,
12) Slip the heat proof sleeving over the live and neutral cores of the supply cable.
13) Lift off the terminal block cover and make the electrical connections according to the
14) Replace the terminal block cover.
15) Pull any excess cable back through the grommet but do not pull the cable tight.
16) Replace the reflector and secure in place using the serrated washers and screws
17) Insert a lamp observing the maximum wattage and lamp type marked on the lampholder
18) Replace the diffuser and tighten the four screws. Take care not to over-tighten.
19) Restore the power and switch on.
Choose the location for your new light fitting giving consideration to the points listed
opposite.
Remove the diffuser by removing the four retaining screws and lifting off.
Remove the two screws from the reflector and lift off.
Drill out four fixing holes in the back of the fitting according to your chosen fixing method.
Four holes have been part made in the feet of the fitting to enable the fitting to be
secured to a solid surface and markings are provided on the back of the fitting to show
the location of BESA fixing holes. If fitting using a BESA box, and additional gasket will
be required to maintain the water-proofing.
Choose the point for cable entry and remove the corresponding knock-out. With care and
patience, this can be cut out using a strong sharp knife or using a 24mm core drill bit.
Using the fitting as a template, mark the location of your fixing holes on the mounting
surface.
Secure the fitting in position using suitable fixings ( not supplied ).
Cover the heads of the screws with silicone sealant ( not supplied ).
Pierce one of the rubber grommets and thread your supply cable through. The grommet
should be a tight fit on the cable to ensure a waterproof seal.
route it around the perimeter of the case, away from the heat of the lamp.
colour code listed opposite and noting the terminal identification in the fitting.
removed earlier.
and listed on the back of this leaflet.
Related parts for BH100D
Image
Part Number
Description
Manufacturer
Datasheet
Request
R

Part Number:
Description:
LIGHT FITTING, CEILING, SLIM, 16W
Manufacturer:
ETERNA
Datasheet:

Part Number:
Description:
TRANSFORMER, 12V, 105VA, 5WAY
Manufacturer:
ETERNA
Datasheet:

Part Number:
Description:
PHOTOCELL, MINIATURE, REMOTE FIXING
Manufacturer:
ETERNA
Datasheet:

Part Number:
Description:
PHOTOCELL, NEMA, SOCKET
Manufacturer:
ETERNA
Datasheet:

Part Number:
Description:
PHOTOCELL, NEMA SOCKET KIT
Manufacturer:
ETERNA
Datasheet:

Part Number:
Description:
PHOTOCELL, WITH TIMER
Manufacturer:
ETERNA
Datasheet:

Part Number:
Description:
SWITCH, LIGHTING, AUTO
Manufacturer:
ETERNA
Datasheet:

Part Number:
Description:
PHOTOCELL, MINIATURE
Manufacturer:
ETERNA
Datasheet:


Part Number:
Description:
BRICK LIGHT, FRAMED
Manufacturer:
ETERNA
Datasheet:

Part Number:
Description:
BULKHEAD, GREY
Manufacturer:
ETERNA
Datasheet:

Part Number:
Description:
BULKHEAD, CORNER, BLK
Manufacturer:
ETERNA
Datasheet:

Part Number:
Description:
DOWNLIGHT, L/V, POLISHED CHROME
Manufacturer:
ETERNA
Datasheet:
Part Number:
Description:
TRANSFORMER, 12V, 105VA, 5WAY
Manufacturer:
ETERNA
Datasheet: