AT60-14-0122 Amphenol Sine Systems Corp, AT60-14-0122 Datasheet - Page 14
AT60-14-0122
Manufacturer Part Number
AT60-14-0122
Description
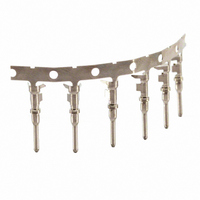
CONN PIN 14-16AWG SIZE 16 NICKEL
Manufacturer
Amphenol Sine Systems Corp
Series
AT Series™r
Type
Stampedr
Specifications of AT60-14-0122
Contact Termination
Crimp
Pin Or Socket
Pin
Wire Gauge
14-16 AWG
Contact Finish
Nickel
Connector Type
Contact, Crimp
Contact Plating
Nickel
Contact Material
Copper Alloy
Wire Size (awg)
16-14
Gender
Pin
Contact Gender
Pin
For Use With
889-1029 - CONN RCPT 12POS 14-20AWG SIZE 16889-1028 - CONN RCPT 8POS 14-20AWG SIZE 16889-1027 - CONN RCPT 6POS 14-20AWG SIZE 16889-1026 - CONN RCPT 4POS 14-20AWG SIZE 16889-1025 - CONN RCPT 3POS 14-20AWG SIZE 16889-1024 - CONN RCPT 2POS 14-20AWG SIZE 16889-1011 - CONN RCPT 12POS 14-20AWG SIZE 16889-1010 - CONN RCPT 12POS 14-20AWG SIZE 16889-1009 - CONN RCPT 12POS 14-20AWG SIZE 16889-1008 - CONN RCPT 12POS 14-20AWG SIZE 16889-1007 - CONN RCPT 8POS 14-20AWG SIZE 16889-1006 - CONN RCPT 8POS 14-20AWG SIZE 16889-1005 - CONN RCPT 8POS 14-20AWG SIZE 16889-1004 - CONN RCPT 8POS 14-20AWG SIZE 16889-1003 - CONN RCPT 6POS 14-20AWG SIZE 16889-1002 - CONN RCPT 4POS 14-20AWG SIZE 16889-1001 - CONN RCPT 3POS 14-20AWG SIZE 16889-1000 - CONN RCPT 2POS 14-20AWG SIZE 16AT04-12PD-EC01 - CONN RCPT 12PIN KEY D W/END CAPAT04-12PC-EC01 - CONN RCPT 12PIN KEY C W/END CAPAT04-12PB-EC01 - CONN RCPT 12PIN KEY B W/END CAPAT04-08PD-EC01 - CONN RCPT 8PIN KEY D W/END CAPAT04-08PC-EC01 - CONN RCPT 8PIN KEY C W/END CAPAT04-08PB-EC01 - CONN RCPT 8PIN KEY A W/END CAP
Lead Free Status / RoHS Status
Lead free / RoHS Compliant
Contact Finish Thickness
-
Lead Free Status / RoHS Status
Lead free / RoHS Compliant
Other names
889-1050
889-1050-2
889-1050
889-1050-2
889-1050


11
Contact and Wedge Insertion
1. Grasp crimped contact approx. one
Contact and Wedge Removal
1. Remove wedge by inserting a fl athead
Plug Assembly
4. Insert wedge into connector.
inch behind the contact barrel.
screwdriver head underneath the lip
of the wedge.
2. Hold connector with rear grommet
5. A ‘click’ will be felt when the wedge is
2. Twist the fl athead screwdriver until
facing you.
wedge ‘pops’ out of connector.
fully installed.
3. Push contact straight into connector
3. Use the same fl athead screwdriver to
until a ‘click’ is felt. A slight tug will
confi rm placement.
remove contact inside connector.
Related parts for AT60-14-0122
Image
Part Number
Description
Manufacturer
Datasheet
Request
R

Part Number:
Description:
Male Contact, Stamped & Formed 14-16Awg, Gold Plate, 4000 Pcs. Reel
Manufacturer:
Amphenol Sine Systems Corp

Part Number:
Description:
CONN PIN 12-14AWG GOLD
Manufacturer:
Amphenol Sine Systems Corp
Datasheet:

Part Number:
Description:
CONN PIN 16-18AWG SIZE 16 NICKEL
Manufacturer:
Amphenol Sine Systems Corp
Datasheet:

Part Number:
Description:
CONN MALE 18-20AWG NICKEL PLATE
Manufacturer:
Amphenol Sine Systems Corp
Datasheet:

Part Number:
Description:
Automotive Connectors TERM 16 PIN 16-18 AWG
Manufacturer:
Amphenol
Datasheet:

Part Number:
Description:
SEAL BLANK 16AWG
Manufacturer:
Amphenol Sine Systems Corp
Datasheet:

Part Number:
Description:
CONN PLUG 2POS 14-20AWG SIZE 16
Manufacturer:
Amphenol Sine Systems Corp
Datasheet:
Part Number:
Description:
Female Contact, Machined 16-18Awg, Nickel Plate
Manufacturer:
Amphenol Sine Systems Corp
Part Number:
Description:
Specifications: Packaging: Bulk ; Contact Finish: Gold ; Contact Termination: Crimp ; Wire Gauge: 28-30 AWG ; Type: Machined ; Pin or Socket: Pin ; Size: 20 ; Contact Finish Thickness: Flash ; Lead Free Status: Lead Free ; RoHS Status: RoHS Compliant
Manufacturer:
Amphenol Sine Systems Corp
Datasheet: