DMS-20PC-1-RL-C DATEL, DMS-20PC-1-RL-C Datasheet - Page 3
DMS-20PC-1-RL-C
Manufacturer Part Number
DMS-20PC-1-RL-C
Description
Digital Panel Voltmeter
Manufacturer
DATEL
Datasheet
1.DMS-20PC-1-RL-C.pdf
(6 pages)
Specifications of DMS-20PC-1-RL-C
No. Of Digits / Alpha
3.5
Meter Function
DC Voltmeter
Meter Range
± 0V To ± 2V
Digit Height
9.4mm
Operating Temperature Range
0°C To +60°C
Length/height, External
20mm
Accuracy
± 1 Count
Body Material
Polycarbonate
Sample Rate
2.5 Samples/sec
Rohs Compliant
Yes
Lead Free Status / RoHS Status
Lead free / RoHS Compliant
Available stocks
Company
Part Number
Manufacturer
Quantity
Price
Company:

Part Number:
DMS-20PC-1-RL-C
Manufacturer:
DIODES
Quantity:
20 000


www.cd4power.com
4. DISPLAY TEST/HOLD (Pin 9) Function: Pin 9 is a dual-function pin.
5. DISPLAY ENABLE (Pin 2) Function: On all models, tying pin 2 to
6. Gain Adjust: There is a gain-adjust potentiometer on the back
7. Soldering Methods: All models in the DMS-20PC Series easily
DMS-20PC Series
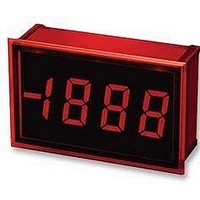
On all standard models (without "-H" suffix), tying pin 9 to pin 1 (+5V
SUPPLY) activates the meter's DISPLAY TEST feature. All display
segments, except the decimal points, will be illuminated. The display
will show "1888" ("–1888" if a negative input signal is present). Do not
leave the meter in the test mode for more than 10 seconds as this
will cause the meter's operating temperature to rise and possibly
affect its performance. Pin 9 must be left open when the test function
is not being used.
On models with the "-H" suffix (DMS-20PC-1-RS-H for example), pin
9 serves as a DISPLAY HOLD control pin. Tying pin 9 to +5V SUPPLY
(pin 1) on these models will hold or "freeze" the current display read-
ing indefinitely. Pin 9 must also be left open when the hold function is
not being used. After disabling DISPLAY HOLD, allow the meter a full
10 seconds to resume normal calibrated operation before holding a
new reading.
The DISPLAY TEST or DISPLAY HOLD pin should normally be con-
nected, via a selector switch, to pin 1 (+5V SUPPLY). If automatic,
logic-controlled operation is desired, only PNP or MOSFET transistors
should be used. The base or gate of these transistors should be driven
sufficiently hard to bring pin 9 within 0.05V of +5V SUPPLY.
pin 1 (+5V SUPPLY) applies full power to the LED display. This is the
normal mode of operating the meter. Leaving DISPLAY ENABLE open
(no connection), only turns off the LED display. The meter's analog-
to-digital converter continues to sample the input signal. Total current
consumption with the display off is approximately 400µA (0.4mA). This
is a very useful feature if the meter is used in battery-powered equip-
ment.
With the exception of the low-power red LED models (DMS-20PC-X-
RL), a regulated voltage lower than +5V SUPPLY can be used to dim
the display intensity. Display intensity control is best performed with
the high brightness, red LED, DMS-20PC-X-RH model. All low-power
red LED models must have DISPLAY ENABLE tied directly to pin 1
(+5V SUPPLY). Voltages applied to DISPLAY ENABLE must never be
greater than +5V SUPPLY.
of each meter. It has approximately ±50 counts (±2.5%) range of
adjustment. Since these devices essentially have no zero/offset
errors, a gain adjustment is effectively an overall accuracy adjustment.
Though they may be performed at any point (except zero), accuracy
adjustments are most effective when performed with higher level
input signals. The circuit shown in Figure 10 provides ±10% range of
adjustment.
withstand most common wave soldering operations. We recom-
mend, however, that you evaluate the effects your particular soldering
techniques may have on the meter’s plastic case and high-precision
electrical performance. We recommend the use of water-soluble
solders and thorough cleaning procedures.
3 ½ D I G I T , L E D D I S P L A Y D I G I T A L P A N E L V O L T M E T E R S
8. Suggested Mating Connectors:
1. Single-Ended Input Configurations: True single-ended measure-
APPLICATIONS
DMS-20PC meters are highly versatile devices that can be used in hun-
dreds of applications. The application circuits chosen for this section are
ones that have historically received many inquiries.
The schematic in Figure 1 shows that the meter's high-impedance input
consists of an op amp powered from a ±5Vdc power supply (the –5V is
internally generated). One can easily see why input signals applied to
(–) INPUT LO and (+) INPUT HI have to be kept within the power supply
rails of ±5V. Also note that only pin 11 has a current-limiting 909kΩ series
resistor. High input voltages that have a common ground with pin 3 (5V
RETURN) should only be applied to pin 11 ((+) INPUT HI) and never to
pin 12. In these high-voltage cases, pin 12 should always be tied to pin 3
(5V RETURN).
The schematic also shows that pin 3 is the meter's zero-volt reference
point — regardless of the type of power or signal source used. This is an
important point to keep in mind when a digital or analog multimeter is used
to make system measurements. The multimeter's negative lead (usually
the black one) must be connected to pin 3 (5V RETURN).
85-264Vac
Panel mounted:
Board mounted:
ments can be made with any DMS-20PC meter. The circuit of Figure
2 avoids problems normally associated with ground-loop currents.
Separate ground runs should be used for 5V RETURN (pin 3) and (–)
INPUT LO (pin 12).
Connector housing
Terminal type
Crimping tool
Wire size
Insulation diameter
Stripping length
Socket DATEL P/N 39-2359625
+
–
V
IN
AC to DC Converter
DMS-PS1-CM
Figure 2. Single-Ended Input Configuration
DATEL
(–) IN LO
(+) IN HI
D I G I T A L P A N E L M E T E R S
+5V SUP
11
12
1
DATEL P/N 39-2079400
DATEL P/N 39-2099090
DATEL P/N 39-2099000
22 to 26 AWG
0.062" (1.57mm) maximum
0.100 to 0.125" (2.54 to 3.17mm)
DMS-20PC-1
2
DISPLAY
ENABLE
MPM_DMS-20PC_C00
6
DP1
3
5V RET
8
REF OUT
7
REF IN
Page 3 of 6
Related parts for DMS-20PC-1-RL-C
Image
Part Number
Description
Manufacturer
Datasheet
Request
R

Part Number:
Description:
DPM, LED, 3.5DIGIT, GREEN
Manufacturer:
DATEL
Datasheet:

Part Number:
Description:
DATEL PANEL METERS
Manufacturer:
Murata Power Solutions Inc
Datasheet:

Part Number:
Description:
DATEL PANEL METERS
Manufacturer:
Murata Power Solutions Inc
Datasheet:

Part Number:
Description:
PANEL CUTOUT PUNCH FOR DMS-20CP
Manufacturer:
Murata Power Solutions Inc
Datasheet:

Part Number:
Description:
LCD SEGMENTED NUMERIC CHARACTER MODULE
Manufacturer:
Datel
Datasheet:

Part Number:
Description:
LCD Modular
Manufacturer:
DATEL
Datasheet:

Part Number:
Description:
METER, LED, 4.5DIGIT, GREEN
Manufacturer:
Murata Power Solutions Inc
Datasheet:

Part Number:
Description:
Current Meter
Manufacturer:
Murata Power Solutions Inc
Datasheet:

Part Number:
Description:
DPM ±20V 3.5 Dig VF LED
Manufacturer:
Murata Power Solutions Inc
Datasheet:

Part Number:
Description:
DPM ±20/200V LCD BkLite 5V-Pwr
Manufacturer:
Murata Power Solutions Inc
Datasheet:
Part Number:
Description:
LCD SEGMENTED NUMERIC CHARACTER MODULE
Manufacturer:
Datel
Datasheet:
Part Number:
Description:
LCD Display Digital Panel Voltmeters
Manufacturer:
Datel
Datasheet:
Part Number:
Description:
3.3V/5V/12V Outputs High-Effi ciency Switching Regulators with LM78XX Pinouts
Manufacturer:
Datel
Datasheet:

Part Number:
Description:
Digital Panel Meters DMS-20 BezelAssembly Panel mount
Manufacturer:
Murata Power Solutions Inc
Datasheet:

Part Number:
Description:
5V Miniature, 5W, DC/DC Converter
Manufacturer:
Datel, Inc.
Datasheet: