HS6E-P44B03-G IDEC, HS6E-P44B03-G Datasheet - Page 15
HS6E-P44B03-G
Manufacturer Part Number
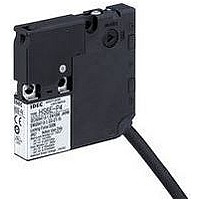
HS6E-P44B03-G
Description
SWITCH, SAFETY INTERLOCK, 2NC, 2A
Manufacturer
IDEC
Series
HS6Er
Datasheet
1.HS6E-L44B03-G.pdf
(20 pages)
Specifications of HS6E-P44B03-G
Contact Voltage Ac Max
125V
Contact Voltage Dc Max
30V
Contact Current Ac Max
2A
Contact Current Dc Max
2A
Switch Terminals
Cable
Contact Configuration
SPST-NC / SPST-NC
Rohs Compliant
Yes
Lead Free Status / RoHS Status
Lead free / RoHS Compliant


(07/03/12)
Recommended Tightening Torque of
Mounting Screws
• Interlock switch: 1.0 to 1.5 N·m (three M4 screws)
• Actuators: 1.0 to 1.5 N·m (two M4 screws)
• The above recommended tightening torques of the mounting
• Mounting bolts are not supplied with the interlock and must be
• To avoid unauthorized or unintended removal of the interlock
• When installing the HS9Z-A62S actuator, use the mounting
• The mounting plate has orientation.
• Do not lose the mounting plate.
Cables
• Do not fasten or loosen the gland at the bottom of the interlock
• When bending the cable during wiring, make sure that the
• When wiring, make sure that water or oil does not enter from
• Do not open the lid of the interlock switch. Otherwise the
• The solenoid has polarity. Make sure of the correct polarity
screws are the values with hex socket head bolts. When other
screws are used and tightened to a smaller torque, make sure
that the screws do not become loose after mounting.
supplied by the user.
switch and the actuator, it is recommended that the interlock
switch and the actuator are installed in an unremovable
manner, for example using special screws, rivets, or welding
the screws.
plate (supplied with the actuator) on the hinged door, and
secure the actuator tightly using two M4 screws.
switch.
cable radius is kept at 30 mm minimum.
the end of the cable.
interlock switch will be damaged.
when wiring.
HS6E Subminiature Interlock Switches with Solenoid
Gland
Gland
(70)
M4 Screws
Mounting Plate (supplied)
Rubber Bushing
Hinged Door
M4 Tapped Hole
Wire Identification
• Wires can be identified by the color and or a white line printed
Note: Wires of gray or gray/white are not used and should not be connected.
Terminal Number Identification
• When wiring, identify the terminal number of each contact by
• The following table shows the identification of terminal
• When wiring, cut unused wires at the end of the jacket to avoid
Note: The contact arrangements show the contact status when the actuator
No. Insulation Color No. Insulation Color
on the wire.
the color of insulation.
numbers.
incorrect wiring.
HS6E-L
HS6E-M
HS6E-N
HS6E-P
1
2
3
4
5
6
10
9
Type
11
8 7
3 2
12
1
is inserted and locked.
4
Orange/White
6
5
Gray/White
Blue/White
Colored Insulation
Orange
Monitor circuit:
Monitor circuit:
Monitor circuit:
Monitor circuit:
Monitor circuit:
Monitor circuit:
Monitor circuit:
Monitor circuit:
Gray
Pink
Main circuit:
Main circuit:
Main circuit:
Main circuit:
Jacket
Blue
Brown
Orange
Blue
Brown
Orange
Blue
Brown
Orange
Blue
Brown
Orange
10
11
12
7
8
9
Door Monitor
Contact Arrangement
11
21
31
11
21
31
11
21
33
11
21
33
Brown/White
Pink/White
12
22
32
12
22
32
12
22
34
12
22
34
Brown
White
Black
Blue
Brown/White
Orange/White
Brown/White
Orange/White
Brown/White
Orange/White
Brown/White
Orange/White
White
Pink
Pink
Pink
Pink
(+)
A2
Lock Monitor
41
53
41
51
41
53
41
51
42
54
42
52
42
54
42
52
(–)
A1
Blue/White
Pink/White
Blue/White
Pink/White
Blue/White
Pink/White
Blue/White
Pink/White
Black
15
Related parts for HS6E-P44B03-G
Image
Part Number
Description
Manufacturer
Datasheet
Request
R

Part Number:
Description:
SWITCH, SAFETY INTERLOCK, 2NC, 2A
Manufacturer:
IDEC
Datasheet:
Part Number:
Description:
SWITCH, SAFETY INTERLOCK, 2NC, 2A
Manufacturer:
IDEC
Datasheet:
Part Number:
Description:
SWITCH, SAFETY INTERLOCK, 2NC, 2A
Manufacturer:
IDEC
Datasheet:
Part Number:
Description:
SWITCH, SAFETY INTERLOCK, 2NC, 2A
Manufacturer:
IDEC
Datasheet:
Part Number:
Description:
SWITCH, SAFETY INTERLOCK, 2NC, 2A
Manufacturer:
IDEC
Datasheet:
Part Number:
Description:
SWITCH, SAFETY INTERLOCK, 2NC, 2A
Manufacturer:
IDEC
Datasheet:
Part Number:
Description:
SWITCH, SAFETY INTERLOCK, 2NC, 2A
Manufacturer:
IDEC
Datasheet:

Part Number:
Description:
Safety Switch Solenoid Lock 1m
Manufacturer:
IDEC
Datasheet:
Part Number:
Description:
Cable; Between IDEC MicroSmart (port 1 or 2) and HG2F/3F/4F; 5 ft.
Manufacturer:
IDEC Corporation
Datasheet:
Part Number:
Description:
Cable; Between IDEC Micro^3C/ONC/MicroSmart (port 2) PLCs and HG2F/3F/4F; 5 ft.
Manufacturer:
IDEC Corporation
Datasheet:
Part Number:
Description:
INDICATOR INCANDESCENT LAMP, GREEN
Manufacturer:
IDEC
Datasheet:

Part Number:
Description:
LAMP, INDICATOR, INCAND, AMB
Manufacturer:
IDEC
Datasheet:
Part Number:
Description:
LAMP, INDICATOR, INCAND, GRN
Manufacturer:
IDEC
Datasheet:
Part Number:
Description:
LAMP, INDICATOR, INCAND, GRN
Manufacturer:
IDEC
Datasheet:
Part Number:
Description:
LAMP, INDICATOR, INCANDESCENT, RED
Manufacturer:
IDEC
Datasheet: