165X14839XE Conec, 165X14839XE Datasheet
165X14839XE
Manufacturer Part Number
165X14839XE
Description
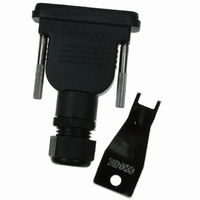
CONN HOOD DSUB 25POS IP67 BLACK
Manufacturer
Conec
Series
165Xr
Specifications of 165X14839XE
Accessory Type
One Piece Backshell
Number Of Positions
25
Cable Type
Round
Cable Exit
180°
Shielding
Unshielded
Hardware
Cable Clamp
Features
Mating Screws, Sealed
Color
Black
Product
Standard Hoods & Connectors
Number Of Positions / Contacts
25
Current Rating
5 A
Mounting Style
Cable
Mounting Angle
Straight
Housing Material
Polybutylene
Insulation
Not Insulated
Ip Rating
IP67
Operating Temperature Range
- 40 C to + 105 C
Voltage Rating
125 V
For Use With
626-1127 - CONN DSUB COMBO 13POS 13W3 SOCKT626-1126 - CONN DSUB COMBO 13POS 13W3 PLUG626-1125 - CONN DSUB COMBO 13POS 13W3 SOCKT626-1123 - CONN DSUB COMBO 17POS 17W2 SOCKT626-1122 - CONN DSUB COMBO 17POS 17W2 PLUG626-1121 - CONN DSUB COMBO 17POS 17W2 SOCKT626-1119 - CONN DSUB COMBO 9POS 9W4 SOCKET626-1118 - CONN DSUB COMBO 9POS 9W4 PLUG626-1117 - CONN DSUB COMBO 9POS 9W4 SOCKET626-1106 - CONN DSUB COMBO 5POS 5W5 PLUG626-1105 - CONN DSUB COMBO 5POS 5W5 SOCKET626-1082 - CONN DSUB HD 44POS FEMALE CRIMP626-1079 - CONN DSUB HD 44POS PLUG CRIMP626-1070 - CONN DSUB 25POS RECEPT CRIMP626-1065 - CONN DSUB 25POS PLUG CRIMP
Lead Free Status / RoHS Status
Lead free / RoHS Compliant
Plating
-
Lead Free Status / Rohs Status
Lead free / RoHS Compliant
Other names
626-1175
Installation Procedure For Resistant Hoods
Assembly steps:
1. Hold connector shell in the position shown on the picture. The holes of the shell have to be placed over the screws in the
hood. Attention: Do not push the shell further into the hood to avoid damaging the detent latches in the hood.
2. Place the assembly key between the connector shell and the hood over the detent latch. Gently pry open the hood while
pushing the connector down into the slot behind the detent latch. Remove the assembly key.
3. Verify that the shell is positioned behind the detent latch on one side of the hood. Place the assembly key between the
opposite side of the connector shell and the hood over the detent latch. Gently pry open the hood while pushing the connector
down into the slot behind the detent latch.
4. Remove the assembly key. Verify that the shell is placed in both slots behind the detent latches.
Related parts for 165X14839XE
Image
Part Number
Description
Manufacturer
Datasheet
Request
R

Part Number:
Description:
CONN BACKSHELL DB15 DL EXIT GREY
Manufacturer:
Conec
Datasheet:

Part Number:
Description:
CONN BACKSHELL DB9 STRAIGHT GREY
Manufacturer:
Conec
Datasheet:

Part Number:
Description:
CONN BACKSHELL DB9 STR BLACK
Manufacturer:
Conec
Datasheet:

Part Number:
Description:
CONN BACKSHELL DB25 STR BLACK
Manufacturer:
Conec
Datasheet:

Part Number:
Description:
CONN BACKSHELL DB25 90DEG BLACK
Manufacturer:
Conec
Datasheet:

Part Number:
Description:
Ind Tunable RF Unshielded Wirewound 33nH to 45nH 150MHz 84/135Q-Factor Aluminum 4.2A RDL Tube
Manufacturer:
COILCRAFT
Datasheet:
Part Number:
Description:
Ind Tunable RF Shielded Wirewound 52nH to 59nH 150MHz 65/75Q-Factor Aluminum 3.4A RDL Tube
Manufacturer:
COILCRAFT
Datasheet:
Part Number:
Description:
5 mm Tunable Inductor
Manufacturer:
Coilcraft
Datasheet:
Part Number:
Description:
mm Tunable Inductor Unshielded LMax = 33nH
Manufacturer:
Coilcraft
Datasheet:
Part Number:
Description:
5 mm Tunable Inductor
Manufacturer:
Coilcraft
Datasheet:
Part Number:
Description:
5 mm Tunable Inductor Unshielded
Manufacturer:
Coilcraft
Datasheet:
Part Number:
Description:
I�/TUNABLE INDUCTOR 46.5 NH W.CORE & SHIELD
Manufacturer:
Coilcraft
Datasheet:
Part Number:
Description:
5 mm Tunable Inductor
Manufacturer:
Coilcraft
Datasheet:
Part Number:
Description:
Combination D-SUB without contacts, For straight high power, coaxial or high voltage contacts
Manufacturer:
CONEC [CONEC Elektronische Bauelemente GmbH]
Datasheet: