E3Z-D82 Omron, E3Z-D82 Datasheet - Page 19
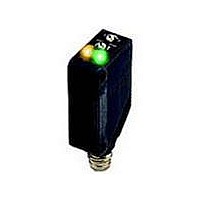
E3Z-D82
Manufacturer Part Number
E3Z-D82
Description
DIFFUSE PNP CABLE
Manufacturer
Omron
Type
Photoelectric Sensorr
Series
E3Zr
Specifications of E3Z-D82
Features
Light ON / Dark ON
Height
33.2 mm
Length
20 mm
Maximum Operating Temperature
+ 55 C
Minimum Operating Temperature
- 25 C
Operating Supply Voltage
12 V to 24 V
Width
10.8 mm
Sensing Distance
1 m
Output Configuration
PNP
Sensing Method
Reflective, Diffuse
Sensing Object
White Paper
Sensing Light
Infrared
Mounting Type
Bracket Mount
Current - Supply
30mA
Voltage - Supply
12 V ~ 24 V
Package / Case
Module, Pre-Wired
Sensing Range
0m To 1m
Output Current
100mA
Sensor Output
PNP Open Collector
Supply Voltage Range Dc
12V To 24V
Lead Free Status / RoHS Status
Lead free / RoHS Compliant
Lead Free Status / RoHS Status
Lead free / RoHS Compliant
Available stocks
Company
Part Number
Manufacturer
Quantity
Price
Company:

Part Number:
E3Z-D82
Manufacturer:
OMRON
Quantity:
1 000
Company:
Part Number:
E3Z-D82-M1J-1
Manufacturer:
OMRON
Quantity:
1 000
Company:
Part Number:
E3Z-D82H
Manufacturer:
OMRON
Quantity:
1 000
Company:
Part Number:
E3Z-D82H
Manufacturer:
OMRON
Quantity:
492
Company:
Part Number:
E3Z-D82K
Manufacturer:
OMRON
Quantity:
1 000


Precautions
To ensure safe sensor operation, please follow the following
precautions:
J Wiring
Power Supply Voltage
Make sure that the power supply to the Sensor is within the rated
voltage range.
Load Short-circuiting
Do not short-circuit the load, or the Sensor may be damaged.
Polarity
Correct polarity wiring is required to prevent damage to the
sensor.
Connection Without Load
Do not connect power supply to the Sensor with no load
connected, or the internal elements may explode or burn.
J Operating Environment
Do not use the Sensor in locations with explosive or flammable
gas.
J Settings
Power Reset Time
The Sensor is ready to operate 100 ms after the Sensor is turned
ON. If the load and Sensor are connected to independent power
supplies respectively, be sure to turn ON the Sensor before
turning the load ON.
Photoelectric Sensor with Built-in Amplifier
J Connections
M8 Metal Connector
•
•
•
•
J Mounting
Use M3 screws to mount the sensor and tighten each screw to a
maximum torque of 0.53 N S m.
E3Z-jjj
Turn off power before disconnecting the sensor.
Remove the connector cover before connecting or discon-
necting the metal connector.
Secure the connector cover by hand. Do not use any pliers,
or the connector may be damaged.
The proper tightening torque range is between 0.3 and 0.4
N S m. Be sure to tighten the connector securely in order to
maintain the the specified degree of protection and to keep
the connector from loosening due to vibration.
E39-L104 Mounting Bracket
(sold separately)
E3Z
19
Related parts for E3Z-D82
Image
Part Number
Description
Manufacturer
Datasheet
Request
R

Part Number:
Description:
Photoelectric Sensors - Industrial Diffuse NPN 1M Coate d 2mCable
Manufacturer:
Omron
Datasheet:
Part Number:
Description:
Photoelectric Sensors - Industrial Detector of PES
Manufacturer:
Omron
Datasheet:

Part Number:
Description:
Photoelectric Sensors - Industrial Detector only for E3 Z-T81
Manufacturer:
Omron
Datasheet:
Part Number:
Description:
Thru Beam Sensor
Manufacturer:
Omron
Datasheet:
Part Number:
Description:
Cable
Manufacturer:
Omron
Datasheet:
Part Number:
Description:
EMITTER ONLY FOR E3Z-T61
Manufacturer:
Omron
Datasheet:

Part Number:
Description:
1 AXIS PNP PREWIRED
Manufacturer:
Omron
Datasheet:
Part Number:
Description:
1 AXIS NPN PIGTAIL W/M8 CONN
Manufacturer:
Omron
Datasheet:
Part Number:
Description:
1 AXIS PNP PIGTAIL W/M8 CONN
Manufacturer:
Omron
Datasheet:

Part Number:
Description:
G6S-2GLow Signal Relay
Manufacturer:
Omron Corporation
Datasheet:
Part Number:
Description:
Compact, Low-cost, SSR Switching 5 to 20 A
Manufacturer:
Omron Corporation
Datasheet:
Part Number:
Description:
Manufacturer:
Omron Corporation
Datasheet: