600619228180 WUERTH ELEKTRONIK, 600619228180 Datasheet
600619228180
Manufacturer Part Number
600619228180
Description
TOOL, DIE, WR-WTB, USE WITH 600003
Manufacturer
WUERTH ELEKTRONIK
Datasheet
1.600649326160.pdf
(2 pages)
Specifications of 600619228180
Rohs Compliant
YES


Wechsel Crimpeinsatz
und Crimpvorgang
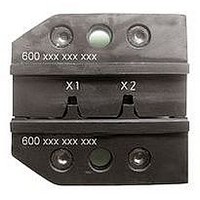
Fig. 2:
- Einsetzen von Obermatrize 5 und Untermatrize
- Locator 2 montieren und mittels Mutter 1
- Kabel auf angepasste Länge abisolieren
Fig. 3:
- Klemmplatte 3 des Locators 4 durch Drehen
- Verbinder entsprechend dem Querschnitt in
- Klemmplatte 3 durch Drehen des Knopfes 7
- Kabel in Verbinder einführen
Fig. 4:
- Zange schließen und nach Überwindung der
- Klemmplatte 3 des Locators 4 durch Drehen
- vercrimpten Verbinder entnehmen
Replacing crimping dies
and crimping procedure
Fig. 2:
- Insert the upper die 5 and lower die 6 into
- Fit the locator 2 an fix it with the screw nut 1
- Strip the cable over a reasonable length
Fig. 3:
- Open the clamp sheet 3 by turning the
- Place the connector inside the locator 4 –
- Close the clamp sheet 3 by turning the
- Insert the cable in the connector
Fig. 4:
- Close the handles of the tool until they
- Open the clamp sheet 3 by turning the
- remove the crimped connector
6, Zange soweit schließen, dass sich Ober-
und Untermatrize zentrieren können, Befes-
tigungschrauben 4 festziehen
befestigen
des Knopfes 7 öffnen
Locator 4 einlegen
schließen
letzten Raststufe öffnen (Zwangssperre)
des Knopfes 7 öffnen
the jaws, tighten them up enough so you can
position the top and lower dies, secure the
dies with the screws 4
knob 7
according to the cross section
knob 7
open automatically (lock)
knob 7
Fig. 2
Fig. 3
Fig. 4
www.we-online.com
03
Garantie
Die Crimp- Systemzange unterliegt einer sorgfäl-
tigen Qualitätskontrolle. Es gelten die allgemei-
nen Garantiebestimmungen.
Wartung und Instandhaltung
Die Crimp-Systemzange muss vor Arbeitsbeginn
in einem ordnungsgemäßen und sauberen Zu-
stand sein. Crimprückstände sind zu entfernen.
Die Gelenke sind regelmäßig mit leichtem Ma-
schinenöl zu ölen und vor Verschmutzung zu
schützen. Es ist darauf zu achten, dass alle Bol-
zen durch Sicherungsringe gesichert sind. Der
Festsitz der Schaftschraube zur Sicherung der
Stellscheibe ist zu prüfen. Die Instandhaltung der
Zange sollte beim Hersteller erfolgen.
www.we-online.com
Warranty
These crimp system tool are subject to thorough
quality control before leaving the factory. The en-
closed general terms and conditions of warranty
apply.
Service
Before using the crimp system tool, make sure it
is in a clean and proper operating state. Always
remove crimping residue. Protect the joints from
soiling and apply light machine oil to them re-
gularly. Check the bolts regularly to ensure that
the lock washers and headless screw, securing
the adjustment dial, are intact and tight. All other
maintenance should be performed by the manu-
facturer.
Allgemeines
Die Bedienungsanleitung muss ständig bei der
Zange verfügbar sein. Die Zange ist nach dem
neuesten Stand der Technik und den anerkannten
sicherheitstechnischen Regeln hergestellt.
Die Zange darf nur in technisch einwandfreiem
Zustand sowie sicherheits- und gefahrenbewusst
benutzt werden und ist nur für den in der Be-
dienungsanleitung beschriebenen Zweck zu ver-
wenden.
!
EINE EIGENMÄCHTIGE VERÄNDERUNG
ODER EINE NICHT BESTIMMUNGS-
GEMÄßE VERWENDUNG DER
HANDCRIMPZANGE SCHLIESST
EINE HAFTUNG DES HERSTELLERS
FÜR DARAUS RESULTIERENDE
SCHÄDEN AUS.
Bedienungsanleitung
WE Crimp Systemzange
Operation Manual
WE Crimp Base Tool
Preface
The Operating Instructions must always be
within reach of the hand crimping tool. This Crimp
System Tool may be used only for the inten-
ded application and in strict compliance with all
applicable safety rules, regulations and practices.
It must be properly maintained, undamaged and
in good working order. Unauthorized modifica-
tion is prohibited and voids the manufacturer’s
warranty. Always wear safety glasses with side
shields and other appropriate personal protective
equipment.
!
MISUSE MAY CAUSE PERSONAL
INJURY. KEEP OUT OF REACH
OF CHILDREN!
NEVER INSERT FINGERS BETWEEN
THE JAWS OF THE TOOL!
Vor Beginn aller
Arbeiten Bedienungs-
anleitung lesen!
Read these instructions
completely before
using this tool!
600619228180 Summary of contents
Page 1
Wechsel Crimpeinsatz Fig. 2 und Crimpvorgang Fig Einsetzen von Obermatrize 5 und Untermatrize 6, Zange soweit schließen, dass sich Ober- und Untermatrize zentrieren können, Befes- tigungschrauben 4 festziehen - Locator 2 montieren und mittels Mutter 1 befestigen - ...
Page 2
Bedienungsanleitung – Handcrimpzange Operation Manual – Crimp Tool Verwendungszweck Application Mit der Crimp-Systemzange können unter Einsatz The Crimp System Tool has been developed for verschiedener Crimpeinsätze die unterschied- optimal crimping of a large variety of connectors lichsten Crimpkontakte verarbeitet werden. ...