OXYMAC50.V.2 Honeywell, OXYMAC50.V.2 Datasheet - Page 2
OXYMAC50.V.2
Manufacturer Part Number
OXYMAC50.V.2
Description
Flow Sensors Board Interface KGZ/GMS 0-100%
Manufacturer
Honeywell
Datasheet
1.OXYMAC50.A.2.pdf
(4 pages)
Specifications of OXYMAC50.V.2
Accuracy/reliability
+/- 2 % Full Scale
Supply Voltage
24 V
Lead Free Status / RoHS Status
Lead free / RoHS Compliant


Oxymac50, DE800 and Elecdit
TECHNICAL DATA
Measuring range
Power source
Other inputs
Power consumption (interface)
Outputs
Accuracy
Resolution
Operating temperature
Storage temperature
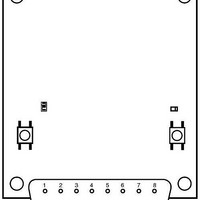
Dimensions
Connector
Mates with type
Notes: For warm up time and other sensor characteristics refer to datasheet 100470-EN
(1)
OPERATING AND CALIBRATION NOTES
Oxymac50
1. Reset of the Oxymac50 is possible by putting the power off/on.
2. The output signal can be 0 V to 10 V or 4 mA to 20 mA. The output signal is factory set by the solder bridge JP1.
3. A proper operation of a connected sensor and electronic circuit can be tested with the test switch or with an external signal.
4. LED indication - proper sensor operation is indicated by blinking of LED D3.
5. Calibration - sensor and Oxymac circuit can be calibrated in normal air. After a loss of power the Oxymac50 circuit stores the
DE800
1. Heater adjustment - the heater voltage of the sensor can be adjusted with pot meter PC419.
2. Test function - after pressing the test button, the output has to go to a 20% lower output signal. Testing with an external (24 V)
3. Calibration - the sensor can be calibrated in normal air with the calibration button. Calibration is lost after power loss.
4. LED -if the sensor is functioning properly, the LED D4 is blinking.
5. Signal out - if the sensor is functioning properly a pulse signal can be measured at terminal K2.
Elecdit
Adjustment/calibration procedure. The interface is factory set, for sensor replacement follow these instructions.
1. Adjust with Pot1 12 V (internal ±6 V) at Pin 2.
2. Adjust with Pot2 reference at Pin 1 to 10 V ±0.2 V.
3. After approx 60 s an impulse (blinking) signal should be present at Pin 1. Apply at the sensor 95 mbar air, adjust with Pot5 at
4. Adjust with Pot4 0 mV at Pin 10.
5. Adjust with Pot5 Uout to 0 V at Pin 9.
2
After switching the test function the output signal should indicate a 20 % lower value.
calibration value.
signal is possible via terminal TE.
Pin 9 to 0.8 V. Then apply at the sensor 1013 mbar air and adjust with Pot3 at Pin 9 Uout to 8.3 V.
Factory set to voltage or current output
www.honeywell.com/sensing
Oxymac50
+24 Vdc ±20 %
Ext Calibration, Sensor Pump,
Sense and Common, Test
<250 mW
0 V to 10 V, 4 mA to 20 mA
63 mm x 108 mm,
4 mm Ø mounting holes
15 pin male D connector
(1)
DE800
0 % to 25 % oxygen (standard)
0 % to 100 % oxygen (option)
+24 Vdc ±20 %
Ext Calibration, Sensor Pump,
Sense, Common, Heater, Test
<500 mW
4 mA to 20 mA, 0 V to 10 V
80 mm x 100 mm,
6,5 mm Ø mounting holes
Screw connector block
GMS-10, KGZ-10, KGZ-12
-10 °C to 60 °C
-10 °C to 50 °C
2 % full scale
0.04 V
(1)
, Pulse 0 V to 10 V, LED drive
Elecdit
Ext Calibration, Sensor Pump,
Sense and Common
<250 mW
60 mm x 42 mm x 17 mm
2 x 5 pin 2,5 mm x 2,5mm
±15 Vdc ±10 %
Related parts for OXYMAC50.V.2
Image
Part Number
Description
Manufacturer
Datasheet
Request
R

Part Number:
Description:
HONEYWELL ZEPHYR DIGITAL AIRFLOW SENSORS: HAF SERIES-HIGH ACCURACY
Manufacturer:
HONEYWELL [Honeywell Solid State Electronics Center]
Datasheet:

Part Number:
Description:
MOUNTING BARRIER FOR HONEYWELL SERIES 2 OPERATOR INTERFACE PUSHBUTTON SWITCHES
Manufacturer:
Honeywell Sensing and Control
Part Number:
Description:
SEALED OI-SE SWITCH . PER TERRY @ HONEYWELL THERE IS A CHG OF $5.00 EACH FOR P
Manufacturer:
Honeywell Sensing and Control
Part Number:
Description:
LIMIT SWITCH-OT/HONEYWELL KOREA RELAYS (YKC)
Manufacturer:
Honeywell Sensing and Control
Part Number:
Description:
Honeywell Zephyr Digital Airflow Sensors Series-high Accuracy
Manufacturer:
Honeywell International's Solid State Electronics Center (SSEC)
Datasheet:

Part Number:
Description:
DIODE IR EMITTING GAAS SIDE LOOK
Manufacturer:
Honeywell Sensing and Control
Datasheet:

Part Number:
Description:
DIODE IR EMITTING ALGAAS TO-46
Manufacturer:
Honeywell Sensing and Control
Datasheet:

Part Number:
Description:
SENSOR AMP 150PSIS .5-4.5VDC OUT
Manufacturer:
Honeywell Sensing and Control
Datasheet:

Part Number:
Description:
SW MINI TOGGLE ON-OFF-ON SPDT
Manufacturer:
Honeywell Sensing and Control
Datasheet:

Part Number:
Description:
Board Mount Hall Effect / Magnetic Sensors 10mA 3.3V/5V 3-Pin
Manufacturer:
Honeywell
Part Number:
Description:
Board Mount Hall Effect / Magnetic Sensors Digital Position radial lead IC pkg
Manufacturer:
Honeywell
Datasheet:
Part Number:
Description:
Board Mount Hall Effect / Magnetic Sensors 20mA Unipolar 5V/9V/ 12V/15V/18V/24V 3Pin
Manufacturer:
Honeywell
Datasheet: