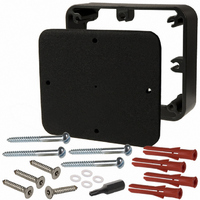
RC120203 Storm Interface, RC120203 Datasheet

RC120203
Manufacturer Part Number
RC120203
Description
CASING FOR 12 KEY KEYPAD REAR
Manufacturer
Storm Interface
Datasheet
1.1KFS0203.pdf
(2 pages)
Specifications of RC120203
Accessory Type
Rear Casing
For Use With/related Products
Storm Keypads
For Use With
MGR1544 - KEYPAD SEALED 12 KEY TELE BLACKMGR1543 - KEYPAD SEALED 12 KEY CALC BLACK
Lead Free Status / RoHS Status
Lead free / RoHS Compliant
Other names
MGR1536
RC120201
RC120202
RC120201
RC120202
FIXING INSTRUCTIONS
(Please read carefully before installation)
1. Select a suitable location with a sound, flat sur-
face. Using the case as a template, mark the po-
sition of the four fixing holes (A) on the surface.
2. Drill and plug the fixing holes to suit fixing
screws (E) as supplied (No. 10 x 50mm Counter-
sunk).
3. Locate the thicker 6mm thick sealing gasket (B)
on the rear face of the case before positioning the
case over the fixing holes (A).
ENVIRONMENTAL
Water/Dust Resistance
Impact Resistance
Operational Temperature
MATERIALS
Case Structure
Finish
Security Screws
Sealing Gaskets
ORDERING DETAILS
Rear Case
100-00-23 Issue 1 Jan 2003
A tough weather resistant housing for mounting the Storm 1000 and 2000 Series 12 way keypads to a wall or surface. The rear casing provides
space behind the keypad for the location of cables, encoding electronics or other components. Alternatively the Rear Case can be set into a wall
or surface to enable flush mounting of the Storm 12 way keypad.
OVERALL DIMENSIONS
.
IP67/NEMA4 when mounted to a
flat, non-porous surface
20 Joules via 50mm dia. Steel
impactor (when keypad fitted and
casing mounted to surface)
-40
Extruded Aluminium
Black Epoxy Powder coat
A2 Stainless steel Torx No. 8 self-
tap
EPDM
RC12020[x]
°
to +100
REAR CASE FOR 1000 SERIES KEYPAD
°
C (dry)
4. Secure the case to the surface using suitable
fixing screws.
Keypad to casing
5. Locate the thinner sealing gasket (C) supplied
with the keypad) on the rear face of the Storm
keypad before positioning the keypad over the
case.
6. Fix the keypad to the case using the thread
forming security screws (D) as supplied. Please
note a special bit is supplied for tightening these
screws.
7. Check the installation to ensure gaskets are in
place and compressed evenly around the perime-
ter of the case.
made to ensure details
are correct at time of
print,
specifications are subject
to change without notice.
Whilst every effort is
Notes :-
On rough or uneven surfaces it may be
necessary to apply a bead of silicone seal-
ant around the inner face of the case at the
point where it meets the mounting surface.
Where this method of sealing is necessary
the thicker sealing gasket (B) should not be
fitted.
All screws and fixing should be suitably
plated or protected against corrosion.
Related parts for RC120203
RC120203 Summary of contents
Page 1
A tough weather resistant housing for mounting the Storm 1000 and 2000 Series 12 way keypads to a wall or surface. The rear casing provides space behind the keypad for the location of cables, encoding electronics or other components. Alternatively ...
Page 2
Front mounted Privacy Shroud for use with Storm K Range and AXS keypads. The Privacy Shroud provides added security for financial transac- tions, access control or other applications where the PIN or Entry Code should be protected against observation or ...


