A16-1NRN Omron, A16-1NRN Datasheet - Page 220
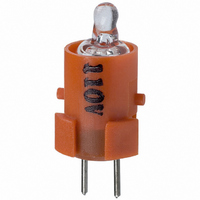
A16-1NRN
Manufacturer Part Number
A16-1NRN
Description
NEON LAMP 110V RED FOR A16
Manufacturer
Omron
Type
Neon Lamp, 110 VoltsACr
Series
A16r
Datasheets
1.M2DA-7001.pdf
(265 pages)
2.A16-1NRN.pdf
(30 pages)
3.A16-2.pdf
(27 pages)
4.A165-CAA.pdf
(17 pages)
Specifications of A16-1NRN
Accessory Type
Neon Lamp Replacement
Supply Voltage
110V
Base Type
Bi-Pin
Colour
Red
Current Rating
1.5mA
Svhc
No SVHC (15-Dec-2010)
Illumination Colour
Red
Operating Lifetime
10000h
Voltage Rating Vac
110V
Average Bulb Life
1000
Color
Red
Illumination
Illuminated
Height
13 mm
Illumination Color
Red
Mounting Style
Snap In
Termination Style
Tabs
Lamp Base Type
Bi-Pin
Rohs Compliant
Yes
Lead Free Status / RoHS Status
Lead free / RoHS Compliant
For Use With/related Products
A16 Series
For Use With
Z1397 - SWTCH KNOB RND 3POS DPDT ILL REDZ1394 - SWTCH KNOB RND 2POS SPDT ILL REDZ1391 - SWTCH KNOB RND 2POS SPDT ILL REDZ1385 - SWITCH KNB RECT 3POS DPDT ILLZ1382 - SWITCH KNB RECT 2POS SPDT ILLZ1379 - SWITCH KNB RECT 2POS SPDT ILLZ1373 - SWITCH KNOB SQ 3-POS DPDT ILLZ1370 - SWITCH KNOB SQ 2-POS SPDT ILLZ1367 - SWITCH KNOB SQ 2-POS SPDT ILLZ1309 - SWITCH PB RND MOM DPDT ILLUM REDZ1305 - SWITCH PB RECT MOM DPDT ILLUMZ1301 - SWITCH PB SQ MOM DPDT ILLUM RED
Lead Free Status / Rohs Status
Lead free / RoHS Compliant
Other names
A161NRN
Z1342
Z1342


A3A
Installation
Mounting and Replacing the Pushbutton
Mounting Direction for the Pushbutton and Switch
•
•
Removing the Pushbutton (Non-lighted Models Only)
•
•
Mounting Switch on a Panel
Mount Leaf Spring
Press the leaf spring into the fitted groove on the upper surface of
the Switch. For an easier fitting, first fit one side of the leaf spring,
then press the other side into the fitting groove.
218
Insert the catches of the Pushbutton into the grooves of the
Switch and push down on the Pushbutton until it is fixed securely
to the Switch.
With lighted models, the LED is built into the Switch and cannot
be replaced.
To remove the Pushbutton, hold both the Pushbutton and the
Switch on the longer sides and pull the Pushbutton away from
the Switch. (If the catches on the Pushbutton are bent outwards,
it may result in malfunction.)
When replacing the Pushbutton, if the cap is held on the sides
with catches, internal components (e.g., plate) may come loose.
Be sure to hold the Pushbutton by the sides without catches (i.e.,
the longer sides of the Switch) when removing.
LED terminals
Grooves in the Switch
Catch
Catches on the Pushbutton
Leaf spring
fitting groove
Switch
Leaf spring
Note: Be sure to fit the leaf spring exactly into the groove, and do
Mount Flange on Panel
Insert the flange from the front surface of the panel.
The flange has two opposing guides to facilitate its insertion into the
panel cutout hole. Be sure the flange does not remain tilted with re-
spect to the panel surface after being installed.
Note: The mounting direction of the flange determines the
Fit Flange with Switch
While holding the flange, insert the opposing supports into the gaps
between the leaf spring and Switch on the longer sides of the hous-
ing, and fit the rectangular hole of the flange with the projections of
the switch housing.
Note: Completely remove any burrs on the panel cutout surface;
Removing Switch
Insert a small flat-bladed screwdriver or tweezers into the flange
support exposed on the rear of the panel. Pry up on each side to pull
out the Switch.
Note: Do not pry up the flange support more than necessary or
Cross Section
not allow it to slip out of the groove.
orientation of the Switch.
otherwise, the flange and Switch will not attach solidly.
the switch holding portions may be damaged.
Panel
Panel
Panel (t = 1 to 1.6 mm)
Flange
Flat-bladed screwdriver
or tweezers
Flange
Guide
Projection
Support
Panel
A3A
Related parts for A16-1NRN
Image
Part Number
Description
Manufacturer
Datasheet
Request
R

Part Number:
Description:
SWITCH PB SQUARE MOM SPDT GREEN
Manufacturer:
Omron
Datasheet:

Part Number:
Description:
SWITCH PB SQUARE MOM SPDT WHITE
Manufacturer:
Omron
Datasheet:
Part Number:
Description:
SWITCH PB SQUARE MOM SPDT YELLOW
Manufacturer:
Omron
Datasheet:
Part Number:
Description:
SWITCH PB RECTANG MOM SPDT BLUE
Manufacturer:
Omron
Datasheet:
Part Number:
Description:
SWITCH PB RECTANG MOM SPDT YEL
Manufacturer:
Omron
Datasheet:
Part Number:
Description:
SWITCH PB SQUARE MOM SPDT BLUE
Manufacturer:
Omron
Datasheet:
Part Number:
Description:
SWITCH PB SQUARE MOM SPDT RED
Manufacturer:
Omron
Datasheet:
Part Number:
Description:
SWITCH PB RECTANG MOM SPDT GREEN
Manufacturer:
Omron
Datasheet:
Part Number:
Description:
SWITCH PB RECTANG MOM SPDT RED
Manufacturer:
Omron
Datasheet:

Part Number:
Description:
SWITCH PB RECTANG MOM SPDT WHITE
Manufacturer:
Omron
Datasheet:
Part Number:
Description:
SWITCH PB ROUND MOM SPDT BLUE
Manufacturer:
Omron
Datasheet:
Part Number:
Description:
SWITCH PB ROUND MOM SPDT GREEN
Manufacturer:
Omron
Datasheet:
Part Number:
Description:
SWITCH PB ROUND MOM SPDT RED
Manufacturer:
Omron
Datasheet:
Part Number:
Description:
SWITCH PB ROUND MOM SPDT WHITE
Manufacturer:
Omron
Datasheet:
Part Number:
Description:
SWITCH PB ROUND MOM SPDT YELLOW
Manufacturer:
Omron
Datasheet: