CY8CKIT-006 Cypress Semiconductor Corp, CY8CKIT-006 Datasheet - Page 13
CY8CKIT-006
Manufacturer Part Number
CY8CKIT-006
Description
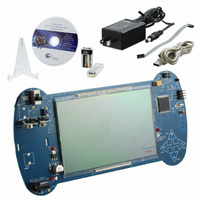
KIT DEV PSOC3 LCD SEGMENT
Manufacturer
Cypress Semiconductor Corp
Series
PSOC™ 3r
Specifications of CY8CKIT-006
Main Purpose
Displays, LCD Display
Embedded
Yes, MCU, 32-Bit
Primary Attributes
448 addressable segments
Secondary Attributes
Configurable LCD pin selection
Description/function
Evaluation Kit
Interface Type
USB
Backlighting
No Backlighting
Data Bus Width
8 bit, 16 bit, 32 bit
Maximum Operating Temperature
+ 50 C
Minimum Operating Temperature
0 C
Number Of Segments
7
Operating Supply Voltage
12 V
Operating Voltage
3.3 V
Pixel Format
16 x 28
Product
Display Modules
Software
Software Included
Touch Panel
No Touch Panel
For Use With/related Products
PSoC 3
Lead Free Status / RoHS Status
Lead free / RoHS Compliant
Utilized Ic / Part
-
Lead Free Status / Rohs Status
Lead free / RoHS Compliant
Other names
428-2994
Available stocks
Company
Part Number
Manufacturer
Quantity
Price
Company:

Part Number:
CY8CKIT-006
Manufacturer:
Cypress Semiconductor Corp
Quantity:
135


3.4.3
3.4.4
CY8CKIT-006 PSoC 3 LCD Segment Drive Evaluation Kit Guide, Doc. # 001-52798 Rev. *C
■
■
■
■
■
When setting the time, pressing RET exits the SetTim sub menu immediately without saving the time
information.
2:SetDat
This sub menu allows to set the date in the format DDMMM-YY.
Enter D1D2MMMABC - Y1Y2. The date is displayed on the matrix display. This application only
displays the last two digits of the year, the year "00" is taken as the year 2000 which is handled as a
leap century.
■
■
■
■
■
■
■
■
■
■
■
If the day is set for a day greater than the number of days in the selected month, then the project
automatically adjusts the day down to 30 or 31 or down to 28 or 29 for February depending on
whether the entered year is a leap year.
When setting the date, pressing RET exits the SetDat sub menu immediately without saving the date
information.
2:SetAlm
This sub menu allows to set the clock alarm time of the day.
Enter H1H2:M1M2 in 12 hour AM/PM alarm clock time. When setting the alarm, the alarm time is
displayed on the large 7-segment display characters using the large colon icon to separate the H1H2
and M1M2 characters. AM and PM are displayed on the 16-segment and 14-segment display
characters.
■
■
■
■
■
■
Press "+" or "-" to select '0' - '9'.
Press SEL to advance to the 16-segment display character.
Press "+" or "-" to select 'A' - 'P'. The 14-segment display character shows 'M'.
Press SEL to enter the time settings. "Push SEL" is prompted on the matrix display.
Press SEL to exit the SetTim sub menu.
The project displays the 01JAN-00 the first time the time is set, the left D position (D1) of the
matrix display is flashed.
Press "+" or "-" button to select the higher date digit of the month, '0' - '3'.
Press SEL to advance to the next D position (D2).
Press "+" or "-" to select '0' - '9'.
Press SEL to advance to select the month of the year.
Press "+" or "-" to select month names, from "JAN" - "DEC".
Press SEL to advance to the left Y position (Y1) of the year.
Press "+" or "-" to select '0' - '9'.
Press SEL to advance to the next Y position (Y2).
Press "+" or "-" to select '0' - '9'.
Press SEL to enter the date settings and return to the "RTC/TEMP" sub menu.
The project displays the 00:00 the first time the alarm is set; the left H position (H1) of the large 7-
segment display is flashed.
Press "+" or "-" to select '0' or '1'.
Press SEL to advance to the next H position (H2).
Press "+" or "-" to select '0' - '9' if H1 is '0' or '0' -'2' if H1 is '1'.
Press SEL to advance to the left M position (M1).
Press "+" or "-" to select '0' - '5'.
Kit Operation
13
[+] Feedback
Related parts for CY8CKIT-006
Image
Part Number
Description
Manufacturer
Datasheet
Request
R

Part Number:
Description:
KIT DEV FOR PSOC3/5
Manufacturer:
Cypress Semiconductor Corp
Datasheet:

Part Number:
Description:
PSoC1/3/5 Development Kit
Manufacturer:
Cypress Semiconductor Corp
Datasheet:

Part Number:
Description:
KIT DEV PSOC PROC MODULE CY8C38
Manufacturer:
Cypress Semiconductor Corp

Part Number:
Description:
KIT DEV PSOC PROC MODULE CY8C29
Manufacturer:
Cypress Semiconductor Corp

Part Number:
Description:
KIT DEV PSOC ANALOG VOLTMETER
Manufacturer:
Cypress Semiconductor Corp
Datasheet:

Part Number:
Description:
KIT DEV PSOC5 FIRST TOUCH
Manufacturer:
Cypress Semiconductor Corp
Datasheet:

Part Number:
Description:
KIT DEV PSOC3 FIRSTTOUCH STARTER
Manufacturer:
Cypress Semiconductor Corp
Datasheet:
Part Number:
Description:
KIT DEV PROC MODULE PSOC5
Manufacturer:
Cypress Semiconductor Corp
Datasheet:

Part Number:
Description:
KIT PSOC CY8C28 FAMILY PROCESSOR
Manufacturer:
Cypress Semiconductor Corp
Datasheet:

Part Number:
Description:
KIT PSOC MINIPROG3 PROGRAM DEBUG
Manufacturer:
Cypress Semiconductor Corp
Datasheet:

Part Number:
Description:
KIT EVAL POWERLINE HIGH VOLT
Manufacturer:
Cypress Semiconductor Corp
Datasheet:

Part Number:
Description:
KIT PSOC FIRST TOUCH
Manufacturer:
Cypress Semiconductor Corp
Datasheet:

Part Number:
Description:
EVAL KIT WORLDTOUR2
Manufacturer:
Cypress Semiconductor Corp
Datasheet:

Part Number:
Description:
KIT UNIVERSAL CAPSENSE CTRLR
Manufacturer:
Cypress Semiconductor Corp
Datasheet:
